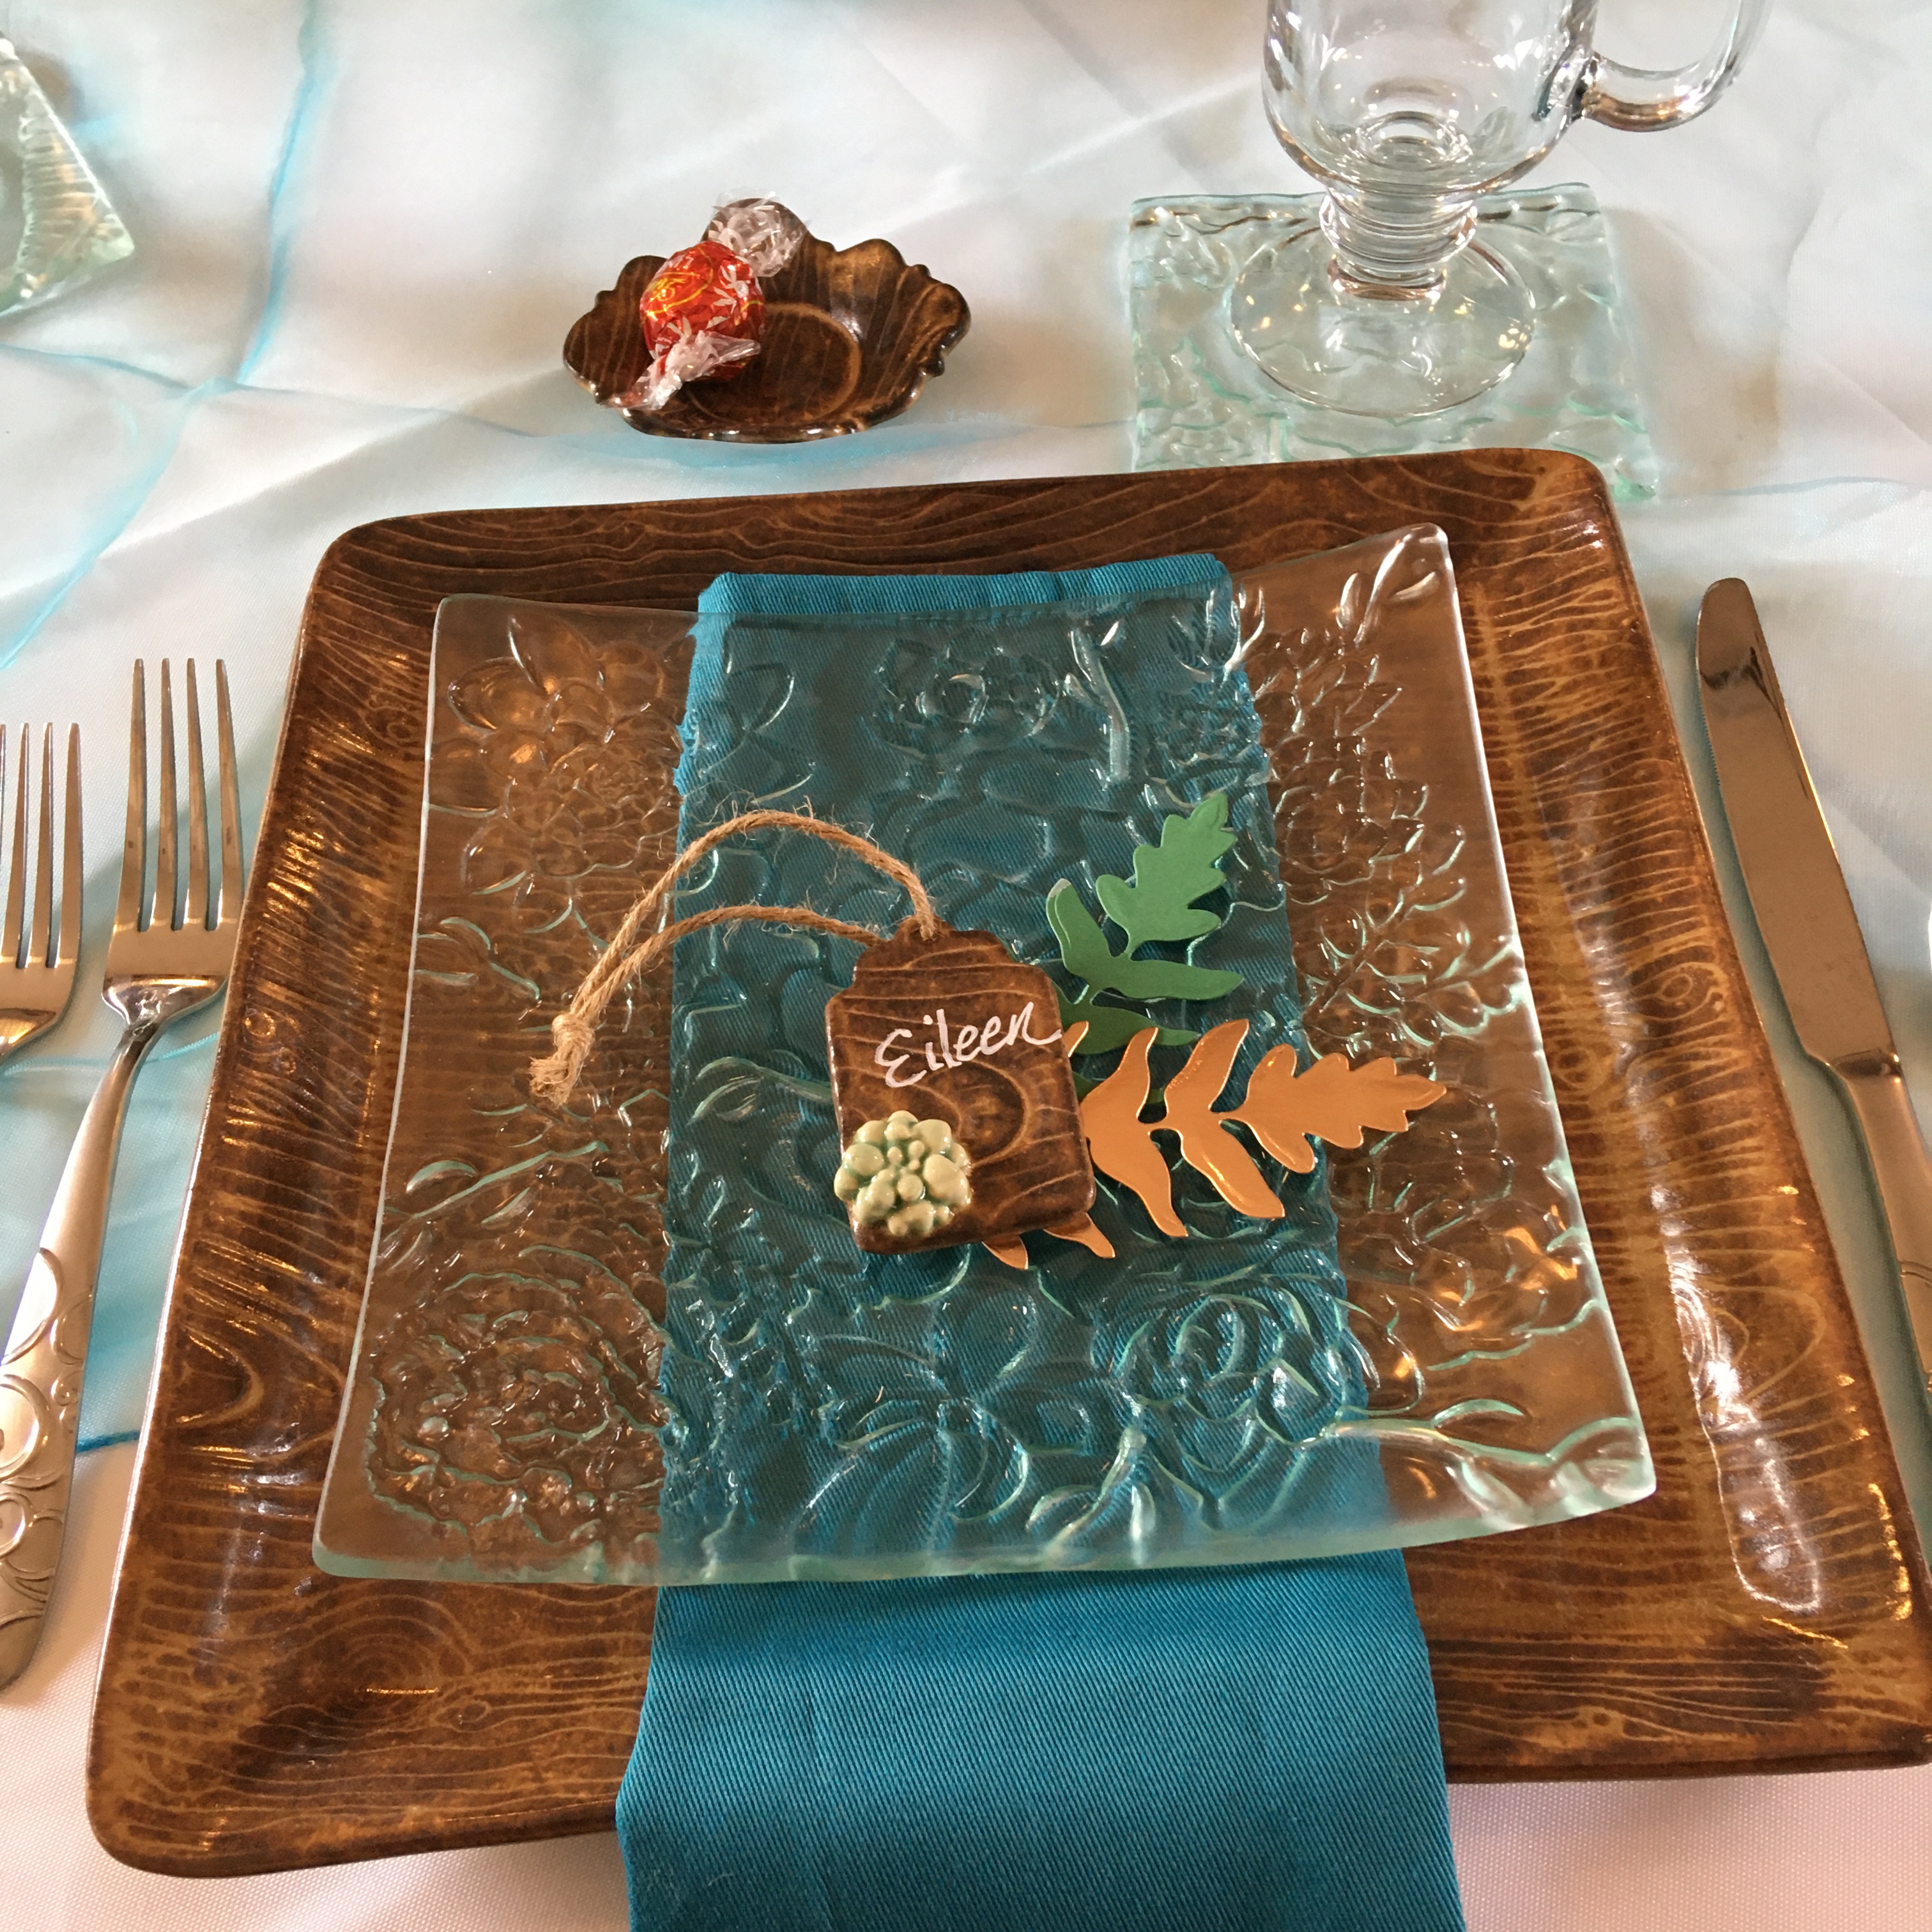
I’ve wanted to make a set of dishes for a long time. I finally did it! I hosted a table at a “Date Night” event. Hosting included making the menu and setting the table, contacting the other 3 couples at my table and request they bring items from the menu. Easy, peasy, right?!!! So, I set the table and make the main dish, everyone else brings the side dishes or dessert! Only, I had this “Amelia Bedelia” moment (a funny children’s book series where the main character, Amelia, takes everything her boss says literally) I thought, oh, I could “make the dishes”like all…make all the actual the plates we will put our food on. I will preference this by saying, some hosts were going to use paper plates for the event. I thought, oh, I will make this extra special, I will make the main dish AND the dishes we eat from. ahahahhahha!!! Three weeks of insanity of planning and making, and continual use my pottery and glass kilns and woo hooo done! I completed a beautiful set of dishes for 8 people. Did I mention and ordering a tablecloth, napkins and fake succulents from Amazon.com helped. ahahahahah!!! 🙂 oh and Lindt Chocolate Truffles. Please, is there anything more delicious and readily available? Especially for Valentine’s?
Here is what I did! I had a succulent texture tile and a fern texture tile from Creative Paradise Glass www.creativeparadiseglass.com and I was already making little succulent vases with my wild clay. I decided to making a theme of succulents and ferns and make dishes with glass and pottery. Using wood forms my husband made for me, I hand-built 9 12″ x 12″ wood grain texture hand-built plates. (always make an extra….) I used float glass from shelving I purchased from a department store that closed for the glassware. Wild clay from my property was used to make little vases. Yes, I used imitation succulents from Amazon, because it was winter. My die cut ferns were made with an older die cut from Spellbinders. The green and copper paper is from Recollections by Michaels.com. My color scheme as you can see was turquoise, wood, copper and white linens, turquoise napkins, turquoise organza overlay on a white tablecloth. The colors worked great because the chairs were a deep green.
Make every meal special! and invite friends to a pot luck date night dinner!
If you have any questions, please leave a comment! I will get back to you!
Next post—- my menu! It was delicious!
Happy Creating!
Eileen
12″ x 12″ wood grain texture clay plate, succulent texture 8 1/4″ x 8 1/4″ salad plate, succulent texture coaster for water glass, turquoise linen napkin, fern die cuts made from copper and green paper, wood grain and succulent name tags served for seating assignments, little trinket dishes for a sweet treatDessert Plates were made with float glass and a fern texture tile from creativeparadiseglassCompleted table setting
The little wooden pottery dish was used for lemon slices
Wow, it’s been a long time since I have posted on my blog! I’ve been busy making, making, making and not recording! Although, I did start an Instagram feed! Check it out! #hydeparkhill Last fall I had three market events and then Christmas! Now that its the new year, I am excited to have lots of projects and good news to share.
My husband is building me a pottery and glass studio! After a year of having a pottery wheel (SSX Thomas Stuart Skutt Wheel) and making due in a small space (a corner of my basement), now I will have a large space with a bathroom in my mom’s basement. I will also be able to move my glass studio from my porch to the other corner in the basement. My husband has also built me an electric slab roller from parts of an old furnace and a wood planer from Habitat for Humanity Restore. It’s amazing!! It rolls the most amazing even slabs ever! Hand-building has become so much easier with even smooth slabs of clay. When my studio is done I will share pics of my new beautiful creative space!
I have been doing more carving in my clay and adding flowers, using embossing rolling pins and all kinds of other exciting experiments with my clay! I am excited for what this year will hold for creativity and design in my pottery, clay and papercraft! Below are pictures of my new designs and new creations for the new year! They are available on my etsy shop! hydeparkhill.etsy.com
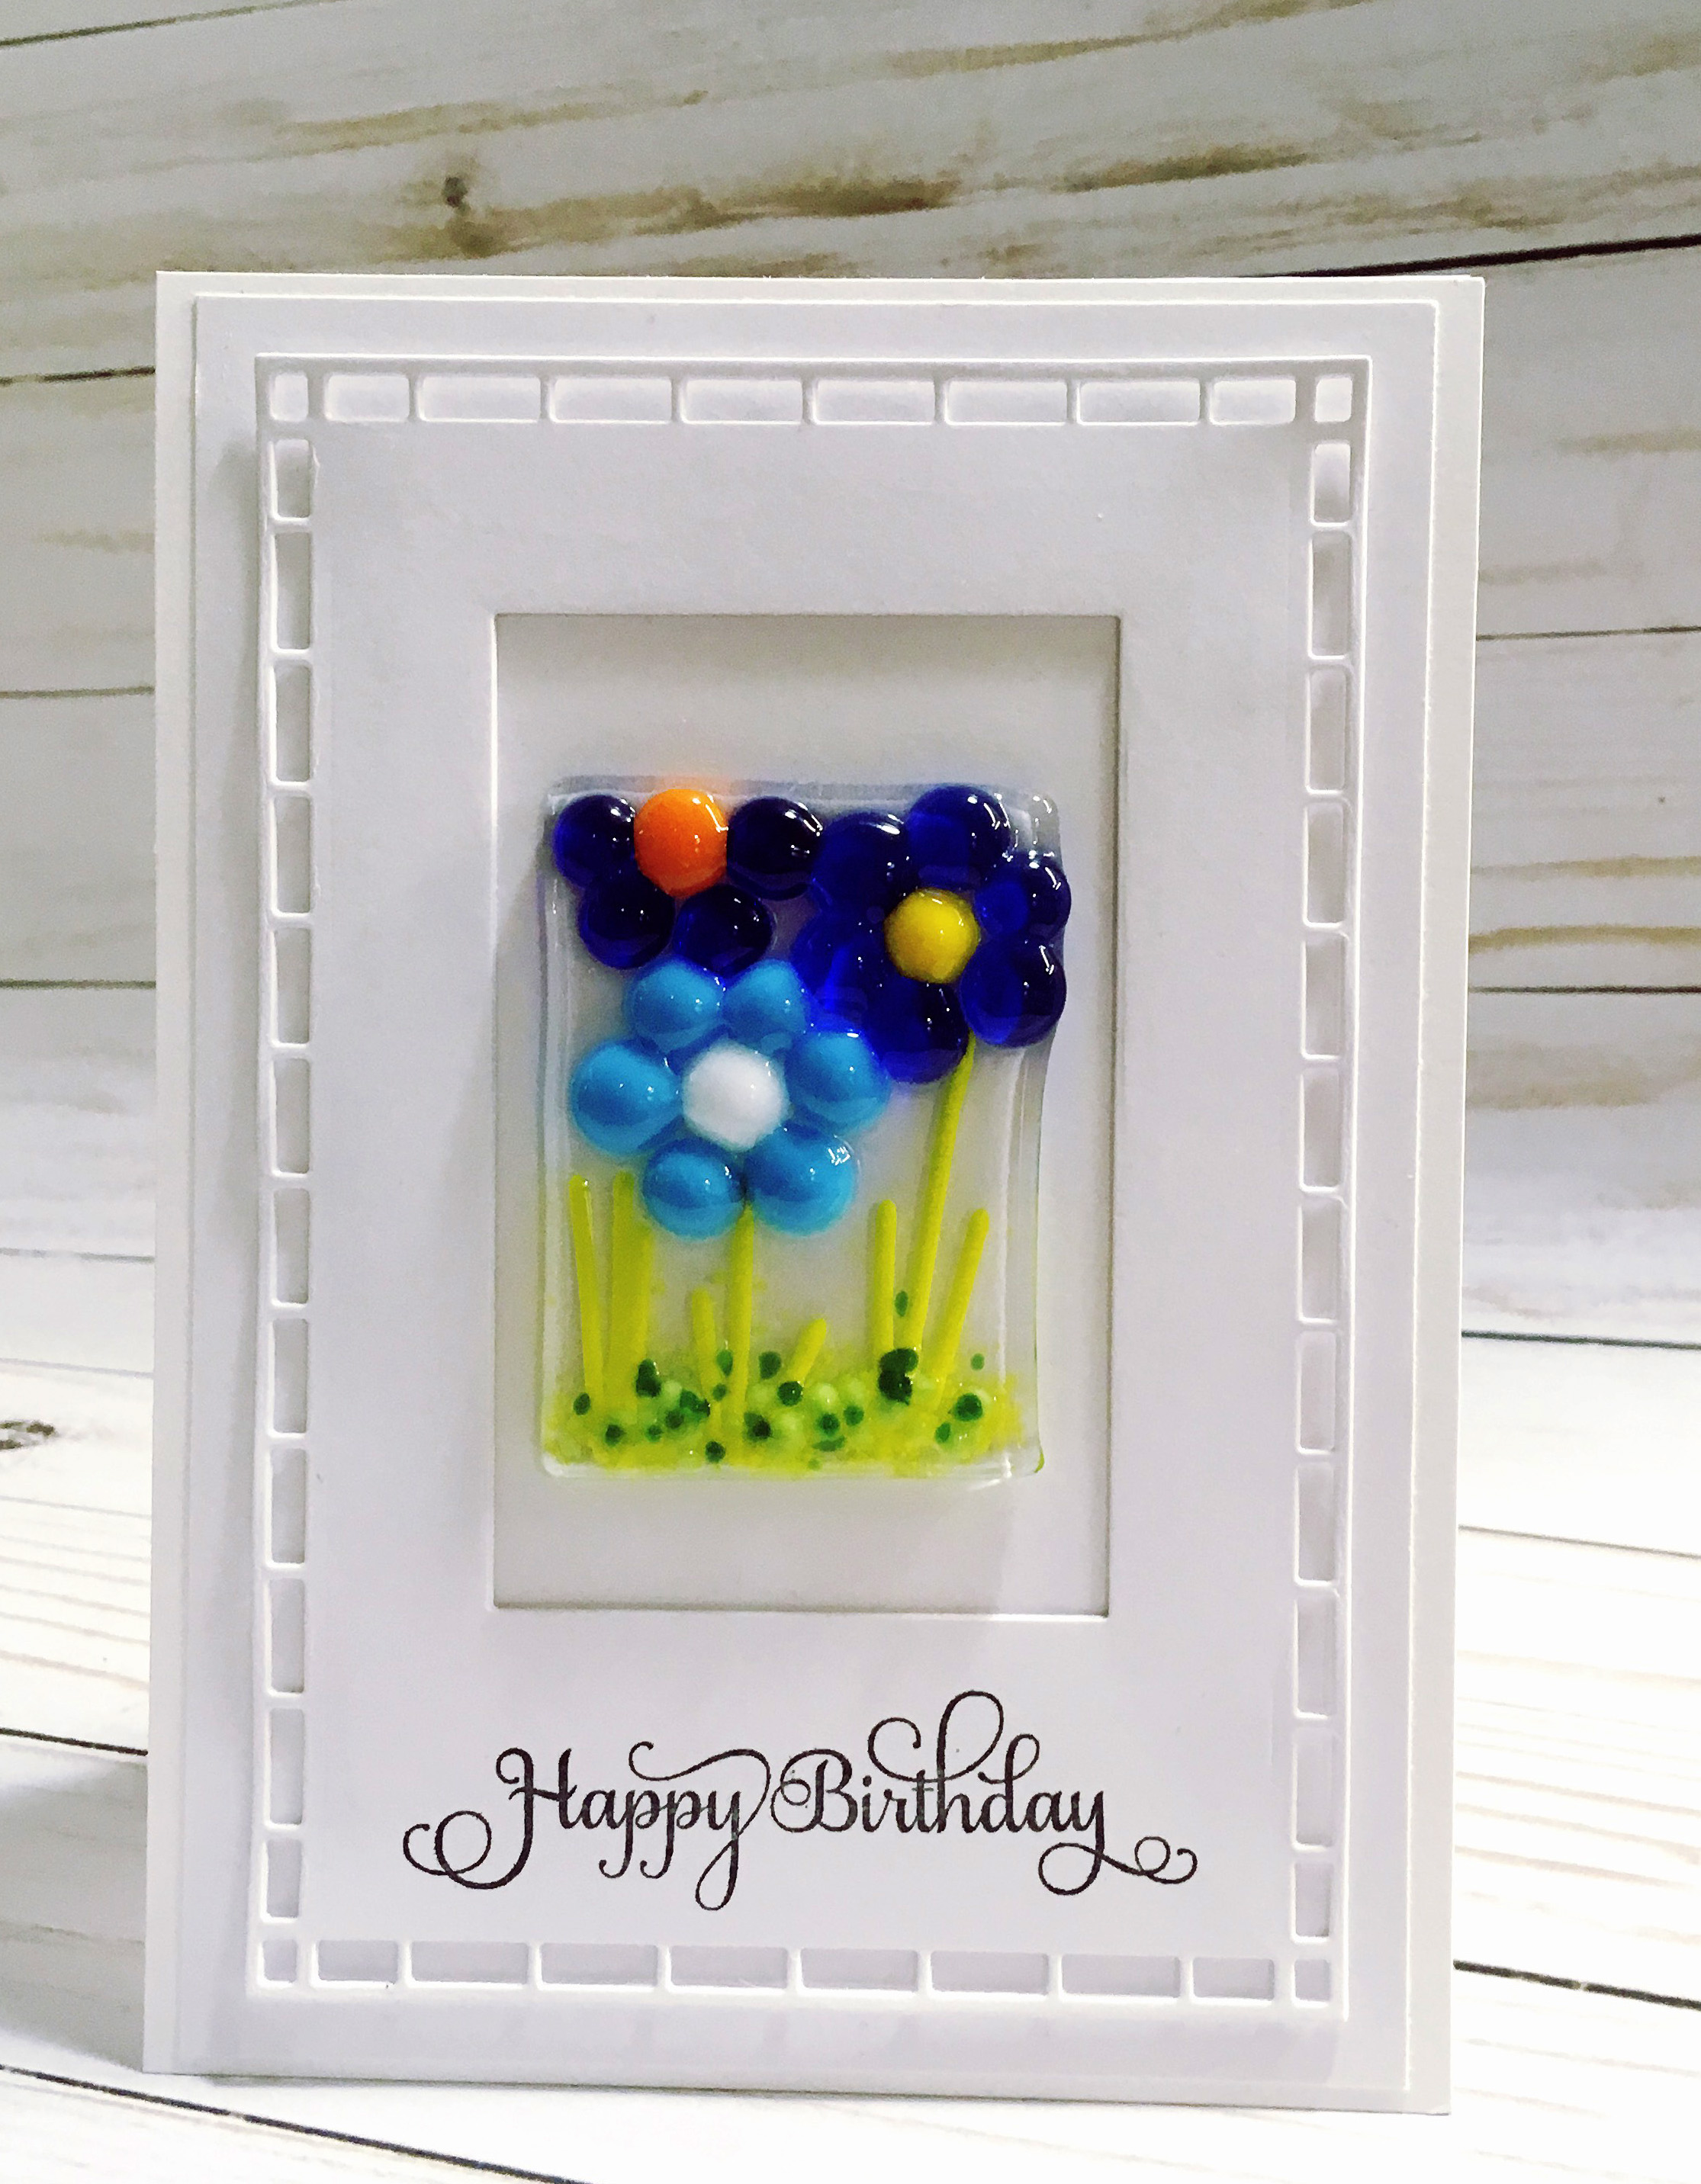
It’s been a while since I have posted! Here is my newest creation in both paper and fused glass!
I made a small panel of glass with dotty flowers, glass stringers and glass frit and fused it to a contour fuse in my glass kiln. Using 110# white card stock I made a hinge card base. The using 65# white card stock, I stamped a sentiment and cut it out with a framing die. Dimensional foam was added behind the frame to give it depth and then added to the card base. Using sticky dots hiding behind the flowers I mounted the glass piece on to the card. Double matted inside for writing a personal message.
Endless possibilities! Change up the sentiment, color and style of the flowers, or some other kind of picture! Ocean? Sailboat? Stencil? ……..endless.
It’s a cold, dark January folks! brrrr….. but my garage is warm with my glass kiln going! Here’s hoping spring is here soon!
Supplies: White opal glass, icicle clear glass, silver foil, Tim Holtz wildflowers dies, Justrite paper craft butterfly die, die cutting machine – I used the Grand Calibur- and a glass kiln 🙂
Directions: Cut your white opal glass into 5.5″ square, icicle clear 5.75″ square. Cut your wildflowers from silver foil (NOT silver leaf). Layer your project- white opal glass, wildflowers, arrange your flowers in a pleasing design. Cap with clear and full fuse. Once it has cooled, slump into a dish form. Enjoy!
If you don’t like wildflowers, use a heart, or any other paper crafting die that will fit on your silver foil page. Experiment. 🙂 Silver reacts differently with different colors of glass. With the white glass it turned a pale yellow gold color. With blue glass it turns a pinkish iridescent color. Some samples of mine are below. They are available for purchase on my etsy shop, hydeparkhill.etsy.com
Here is a fun fused glass soap dish project using a whimsical fish stamp from Heartfelt Creations! Supplies and directions are as follows! Because of the many specialized tools and products used to make this projects I recommend to do this project at a “Paint your own Pottery & Fused Glass Shop”. You could also to this at a paint your pottery shop with ceramic and your own stamps. Use underglaze with the stamps.
Supplies: A glass kiln, glass cutting tools, glass stamp ink, fusible glass- I used System 96 white opal glass and icicle clear glass, hipster soap dish glass mold (Slumpys.com), glass enamel paint G series non-toxic (from Colors of Earth), colored glass frit, millefiori, glass tac or hairspray
Directions: Cut your glass to fit the size of your mold, clean your glass with rubbing alcohol, prepare your glass stamp ink, using a brayer, roll it onto your stamp, stamp your fish onto your glass. When it’s dry, outline with Colors for Earth outlining black, draw your under the sea leaves, let dry. Fill in the fish and leaves with glass enamel colors of choice, let dry. Sprinkle fine blue sky transparent frit for the water, sprinkle fine light and dark amber transparent frit for the sand, put a few millefiori/murrini for little sea creatures around the plants. Use hairspray or glass tac to keep all your pieces in place. Put in kiln, fire to a full fuse. Put in hipster soap dish and slump into the soap dish shape. What a fun project! If you are feeling super creative, make your own soap to fill your dish! 🙂
Good morning! What a lovely spring we are having! I have a special mixed media canvas for you today! My husband and I are fond of the song: “Morning has Broken”. It is an old hymn written in 1931 by an English Eleanor Fargeon and was made popular in 1971 when it was recorded by singer Cat Stevens. Later this week I will have tutorial about how to make this project.
What I love about this canvas is the song is literally bursting forth from the inside the canvas. It features the music and lyrics of the hymn and is full of the new “Classic Petunia” from Heartfelt Creations, as well as some glass and pottery elements I made in my ceramic and fused glass studio. It has a fused glass blackbird and the eggs are made from speckled brown clay.
Do you have a favorite song? You could make it into a mixed media canvas! It’s a fun creative project! Imagine the possibilities! Below are the supplies and directions! The directions are a bit long, but most of the “how to” is easy to see. (A picture says a thousand words!) Enjoy!
Other Supplies: 12” x 12” gallery canvas, satin mod podge/brush, acrylic paint- Lime Green and Thao’s Green, White Gesso, thick modeling paste, crackle medium, moss, bird’s nest, eggs, Morning has Broken sheet music, Morning has Broken lyrics laser printed on vellum, Dries Clear Adhesive, Staz-on: Timber Brown Ink, Distress ink: Wilted Violet, Picked Raspberry, Peeled Paint, Mowed Lawn, Squeezed Lemonade, Vintage photo, Black Soot, a fused glass blackbird with 14 gauge copper legs (or craft bird), 140# cold press watercolor paper, Versa-mark watermark ink, charcoal embossing powder, bamboo skewer painted black, floral foam, glue gun, utility knife, heat tool, water brush, patience.
Instructions: Making the canvas takes a bit of time as it has to dry between layers. While it is drying, use your time in between to make your flowers, because there are lots of flowers in this project. Using a 12” x 12” gallery size canvas and using lime green and Thao’s green acrylic paint, paint the sides, back and inside wood by lightly spreading the two colors into each other. Set aside to dry. Choose a 12” x 12” paper from the classic petunia pad and adhere to the front of the canvas using satin mod podge both under and over the paper. Smooth out any air bubbles. You want it perfectly flat and adhered well. On the inside of the canvas glue a copy of the sheet music “Morning has Broken” that was laser printed on white copy paper. (If you use an ink jet printer, the ink will smear when you put glue on it.) When your canvas is dry, coat the outside sides and inside sides with crackle medium. Set aside to dry again. After it is dry, put a thin coat of white gesso all over the front and a bit heavier coat of white on the sides—as the sides dry it should crack leaving an aged texture, with the green showing underneath. Let it completely dry, this takes couple of hours. With heavy modeling paste and a stencil of a branch and bird stencil on the upper right corner of the canvas. Using a brick stencil and modeling paste, stencil a brick pattern on the right hand side below the bird and all the way down the side to the bottom. Use a hexagon stencil for the upper left corner. Set the canvas aside to completely dry. Meanwhile, using watercolor paper stamp and die cut at least 10 sets of the classic petunias- all sizes, color with Distress Inks, spray with water and shape, set them aside to dry. Cut stamens, ink, and roll into shape, coat tips with glue and dip in Prills, set aside to dry. Stamp and die cut v-shaped hanging basket from the Classic Petunia onto watercolor paper using Versa-mark water mark ink and sprinkle with charcoal embossing powder, heat set, and color petunias with ink. Die cut the basket with black cardstock 4 more times and adhere all the layers to the back of the first one. Paint the bamboo skewer black with black acrylic, after it dries glue the basket to the skewer and set aside to dry. Your canvas should be dry by now. (It helps to let it dry overnight before cutting it.) Take a utility knife and carefully cut your canvas- like you are cutting a pie. Roll back the pieces so it looks like it burst open, once bent they will stay that way and the music you glued on the inside will show. In the inside bottom of the canvas secure the floral foam with hot glue and cover with moss. Insert bird, nest, eggs, and bamboo skewer. Prepare your background piece. Cut a 12” x 12“ paper from the Classic Petunia paper pad to 11” x 11”, adhere to a sturdy piece of 11” x 11” chipboard with mod podge, adhere vellum lyrics piece (Put a thin half inch wide line of mod podge along the top and bottom of the vellum and adhere it to the background paper. The vellum will want to wrinkle, don’t get it too wet with the glue. Hot glue the background piece to the back of canvas by putting the hot glue on the wood part of the canvas and lining up the top of the backdrop piece and slowly lay it on the back. Carefully do this, because once it is down with hot glue, it isn’t going to be able to be “adjusted”. Start to decorate the canvas! Arrange flowers as shown all around. I made my fused glass bird from black fusing glass and I made the eggs from speckled clay that left unglazed and I fired to cone 5. Feel free to substitute! You can use a paper bird or a craft bird & craft eggs from a craft store. After it’s all decorated, put on the back hanger. It might not go in the middle because of the weight of different objects. Hang your canvas or set on a shelf and enjoy, a vision of a spring morning bursting forth in song!
What?? Paper craft and Fused Glass? How does that work?? Doesn’t the paper burn up? How do you get your stamped image to stay on the glass?
I have been fusing glass for about a year now and it started with wanting to make glass koi fish for my son’s pond bathroom (see the finished bathroom here https://hydeparkhill.com/2016/10/12/pottery-adventures-part-2/ ) it was a pottery and glass adventure! Now I am making glass dishes and glass ornaments, glass pendants, and glass this and that and the more I do, the more I want to combine it with my paper crafting skills so here are some of my pieces. 🙂 Check out my hydeparkhill.etsy.com shop! (link on the side bar)
Supplies I used: System 96 Icicle Clear fusing glass 12″ x 6″ piece cut in half, glass slumping mold (I used one from Delphi Glass called “Sweet Treat” it’s a 7 x 7 mold), Papyros glass fusing fiber paper, mold release spray, white high temperature enamel, snowflake stamps and die from the Snow Kissed Collection from Heartfelt Creations, die cutting machine, glass kiln.
Directions: Cut a piece of glass fusing fiber paper with the large snowflake die. Putting a piece of wax paper between the fiber paper and the die will help the fiber paper to come out easier. Fiber paper is more fragile than regular paper and you don’t want it to rip. Follow the directions for mixing the enamel to stamp. (There is a good video about glass stamping on Slumpys.com) Using a brayer, apply the sticky enamel to the stamp, be careful not to put too much on and stamp the top piece of glass with random snowflakes, leaving the space in the middle of the glass blank. On your kiln shelf layer a 7″ x 7″ piece of fiber paper, then the snowflake cut from fiber paper, next the blank piece of glass, the stamped piece of glass and put it into your glass kiln. Set for a full fuse. If you need a fusing schedule, please leave a comment and I will be happy to share mine with you. After it is fully fused, leave the die cut in the bottom of the glass, place the fully fused piece on top of your slump mold. Fuse to a slump temperature. When your kiln is below 100 degrees take it out and enjoy! The snowflakes are now a permanent part of the glass and will not wash off.
Below are some other versions I made with different dies! I think the results are stunning! The creative aspect of possibilities is absolutely endless. The bottom picture shows the gentle slope of the dish. Perfect for dessert, appetizers, a hostess gift, candy, endless possibilities! Enjoy!
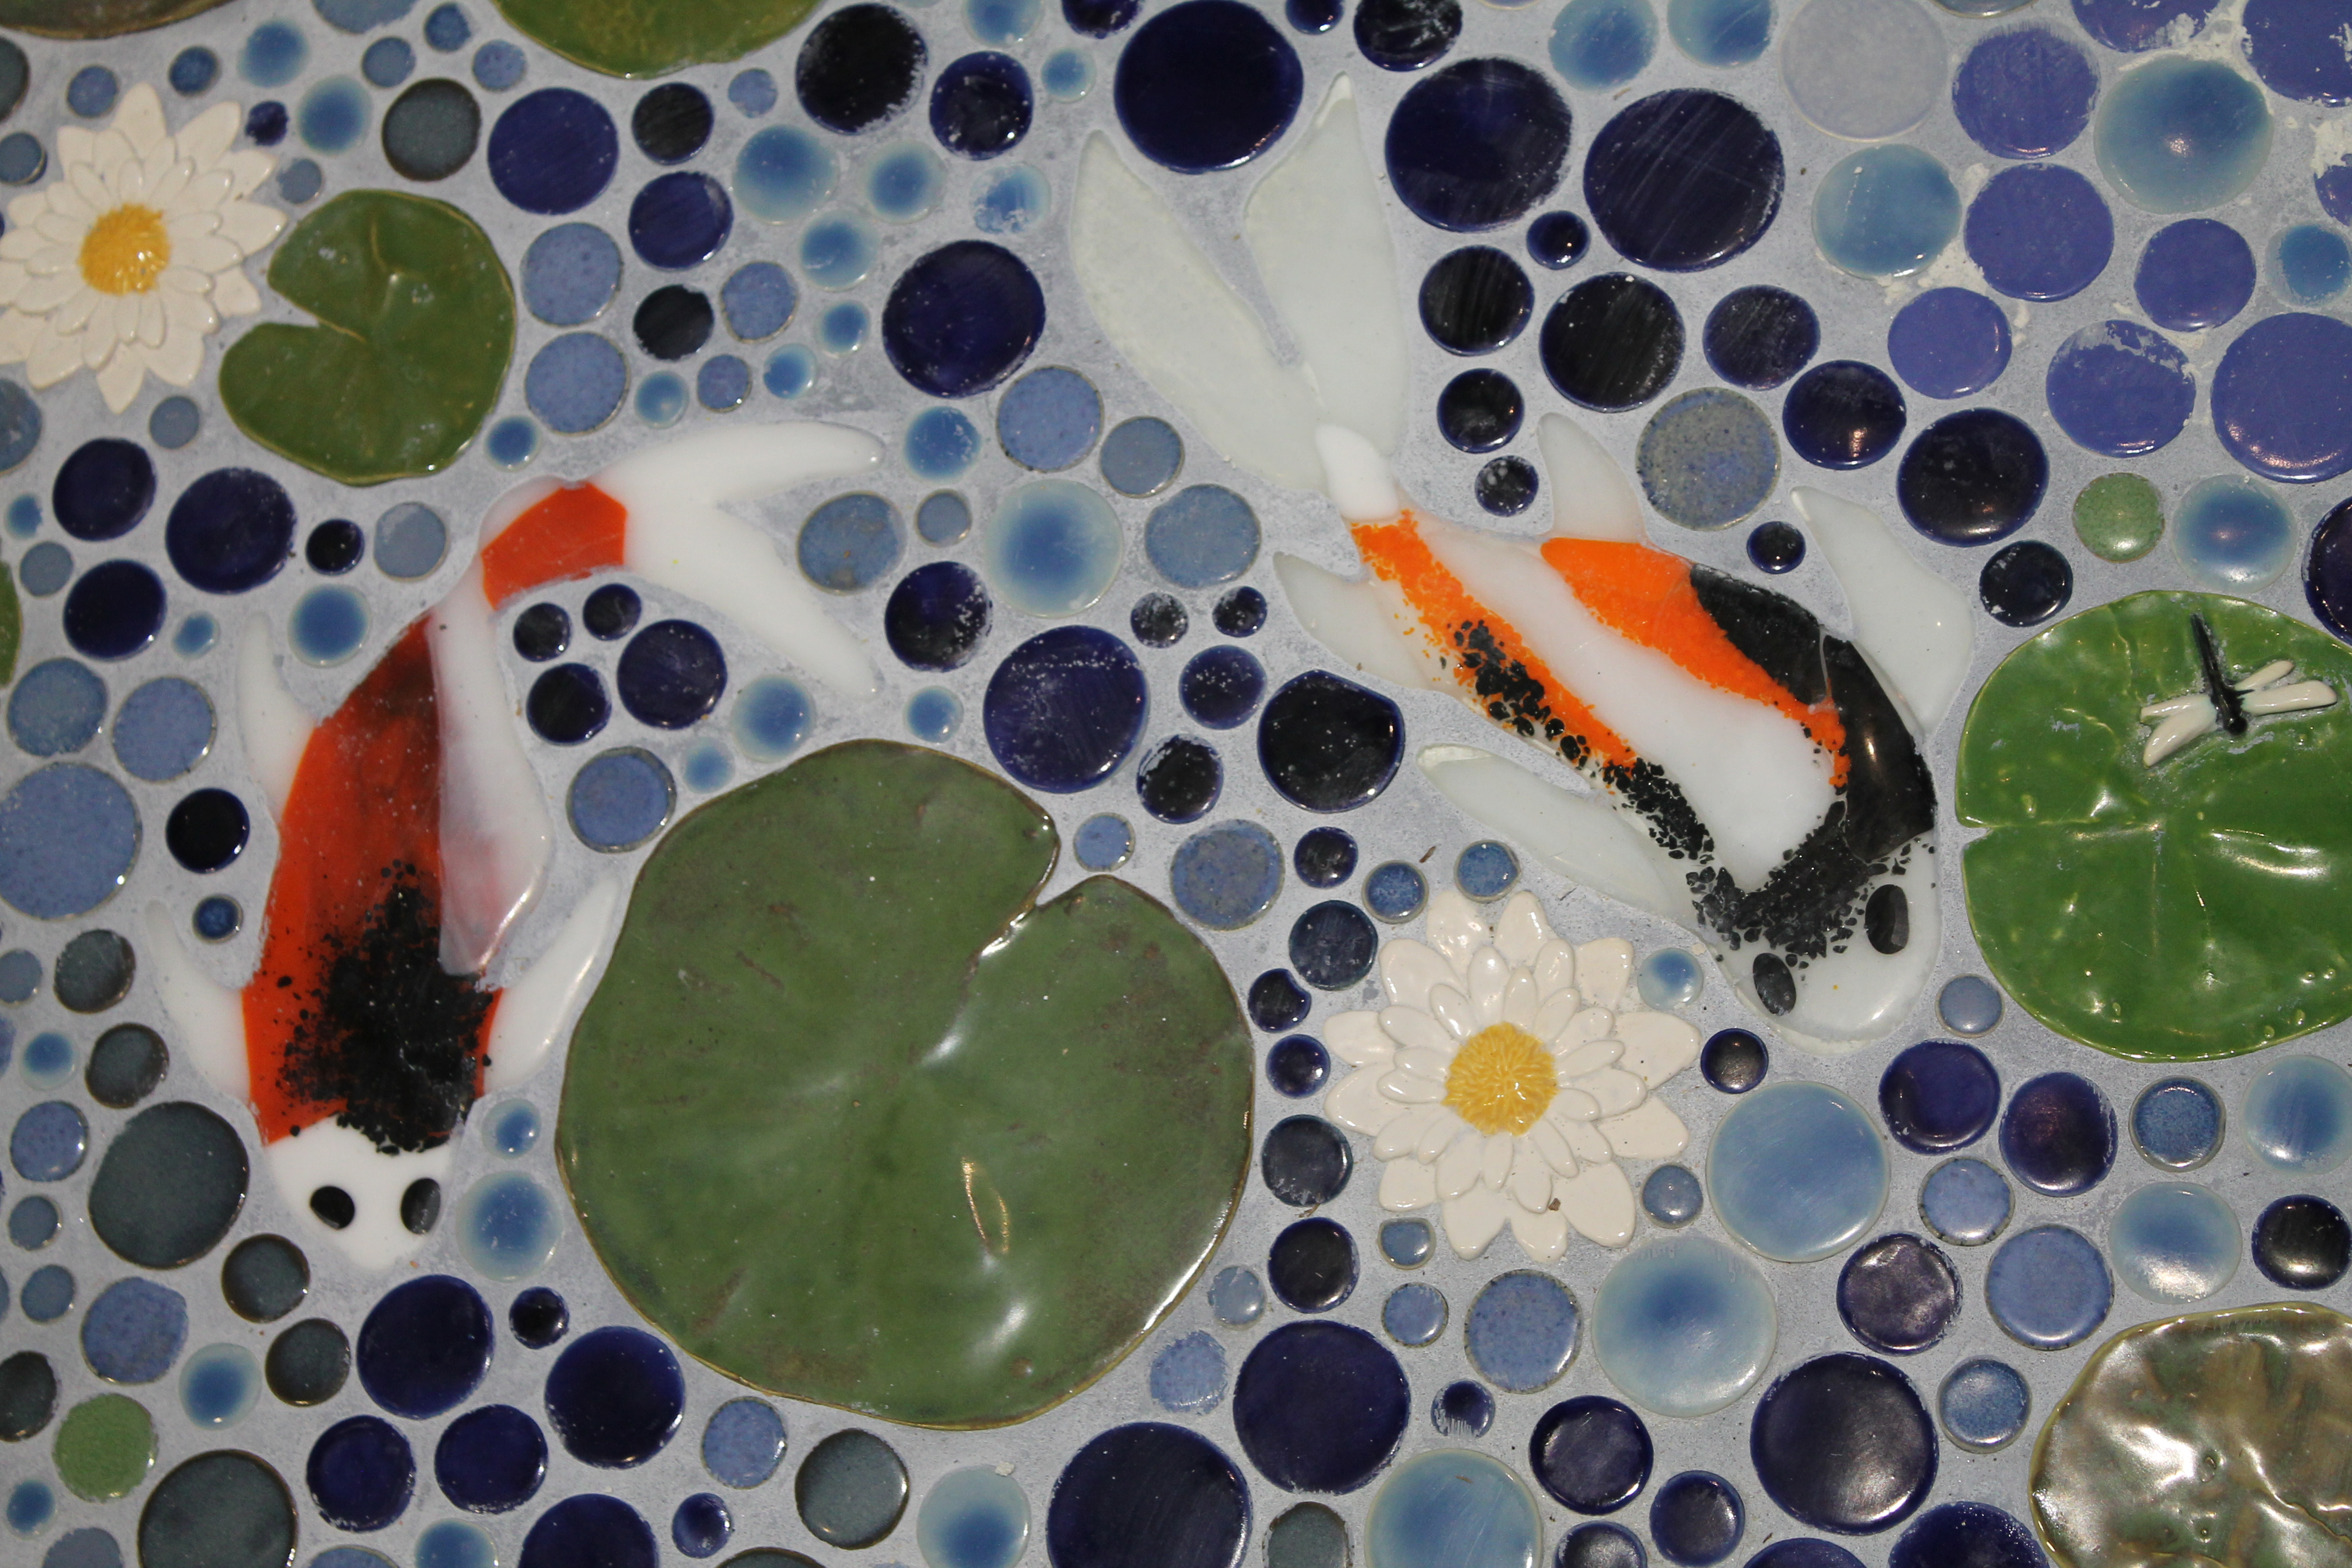
Well, it’s finally done! My handmade ceramic and glass pond bathroom floor has been installed and grouted! It took several months to make, two days to install and 10 hours to grout! Our son loves it!! He said his favorite part is to lay on the dock and look up out the skylight at the sky and watch the clouds go by! ahahahhaha!!!! That makes me laugh!
The tile was handmade at the local “The Potter’s Shop” in Waukesha, WI. http://www.potteryinwaukesha.com To make the turtles, frogs, and water lilies I poured plaster into a bowl and after it hardened I carved into them in reverse 3-D with a Dremel tool. I pressed B-mix stoneware clay into the molds to get my turtles, frogs and lilies. I made the lily pads by using real lily pads to make molds, then pressed slabs of clay into them. I made the glass fish by cutting glass, grinding the pieces with a glass grinder and then fusing them in my glass kiln. If you want to read more about the process, check my other blog post! https://hydeparkhill.com/pottery-adventures/
We laid white thin set mortar on the floor with a notched trowel, cut up our mesh mounted tile into smaller sections and then brought them in on thin flexible boards and put them into place. The final step was to grout. We went to The Tile Shophttps://www.tileshop.com to buy the perfect color grout! (Our large stepping stone in front of the shower was purchased at the Tile Shop too!) We chose a “country blue” grout that wasn’t too dark of a blue or too light so that the tiles and fish pop instead of disappear.
The large stepping stone is in front of the shower. We did put in a heated floor, because its an “inside bathroom” with no heat ducts and it makes the room cozier! There are also no windows, we purchased a remote control skylight and put an opening up through the ceiling all the way through the attic! We picked up the Kolher urinal from our local Habitat for Humanity Restore! It was $5.00!!! Can’t beat that! This is a “galley” bathroom. There are two doors, one at each end, one goes into the master bedroom the other goes to a little alcove across from our son’s bedroom and is also near the kitchen. The master bedroom has another door that goes to the living room and a set of French doors that go to the back deck. Yes, there are locks. 🙂 We have a second bathroom, it’s in our master bedroom and backs up to this one. When you have a small house you get creative with your space, try to make the most of you space, and you try not to waste any space! Every inch counts!
The green foam thing is where our “western toilet” goes! I promise it’s not a squatty potty! The linen closet is on the dock at the moment, as we had to pull it to put in the tile. Just a bit of clean up now and re-install the toilet, linen closet, reconnect the sink and do some touch up on the wall paint. Check the last picture for the final look! But now, of course, we are thinking, it needs some ceramic cattails on the walls. 🙂 perhaps….. later! 🙂
Enjoy the Pictures!
Before the mosaic was installed, we installed the “dock”. We used weathered plank tile.
All the mosaic installed and grouted.A view from the other end.
The towel bar- made with old telephone pole cross bars and jute rope.
Finished!See, we do have a western toilet! 🙂Finished floor, now we have to finish the molding around the door.
Thank you for reading and looking at our adventures!
![IMG_3956[1]](https://i0.wp.com/hydeparkhill.com/wp-content/uploads/2020/02/img_39561.jpg?resize=980%2C980&ssl=1)
![IMG_3954[1]](https://i0.wp.com/hydeparkhill.com/wp-content/uploads/2020/02/img_39541.jpg?resize=980%2C1307&ssl=1)
![IMG_3958[1]](https://i0.wp.com/hydeparkhill.com/wp-content/uploads/2020/02/img_39581.jpg?resize=980%2C980&ssl=1)
![IMG_3960[1]](https://i0.wp.com/hydeparkhill.com/wp-content/uploads/2020/02/img_39601.jpg?resize=980%2C980&ssl=1)