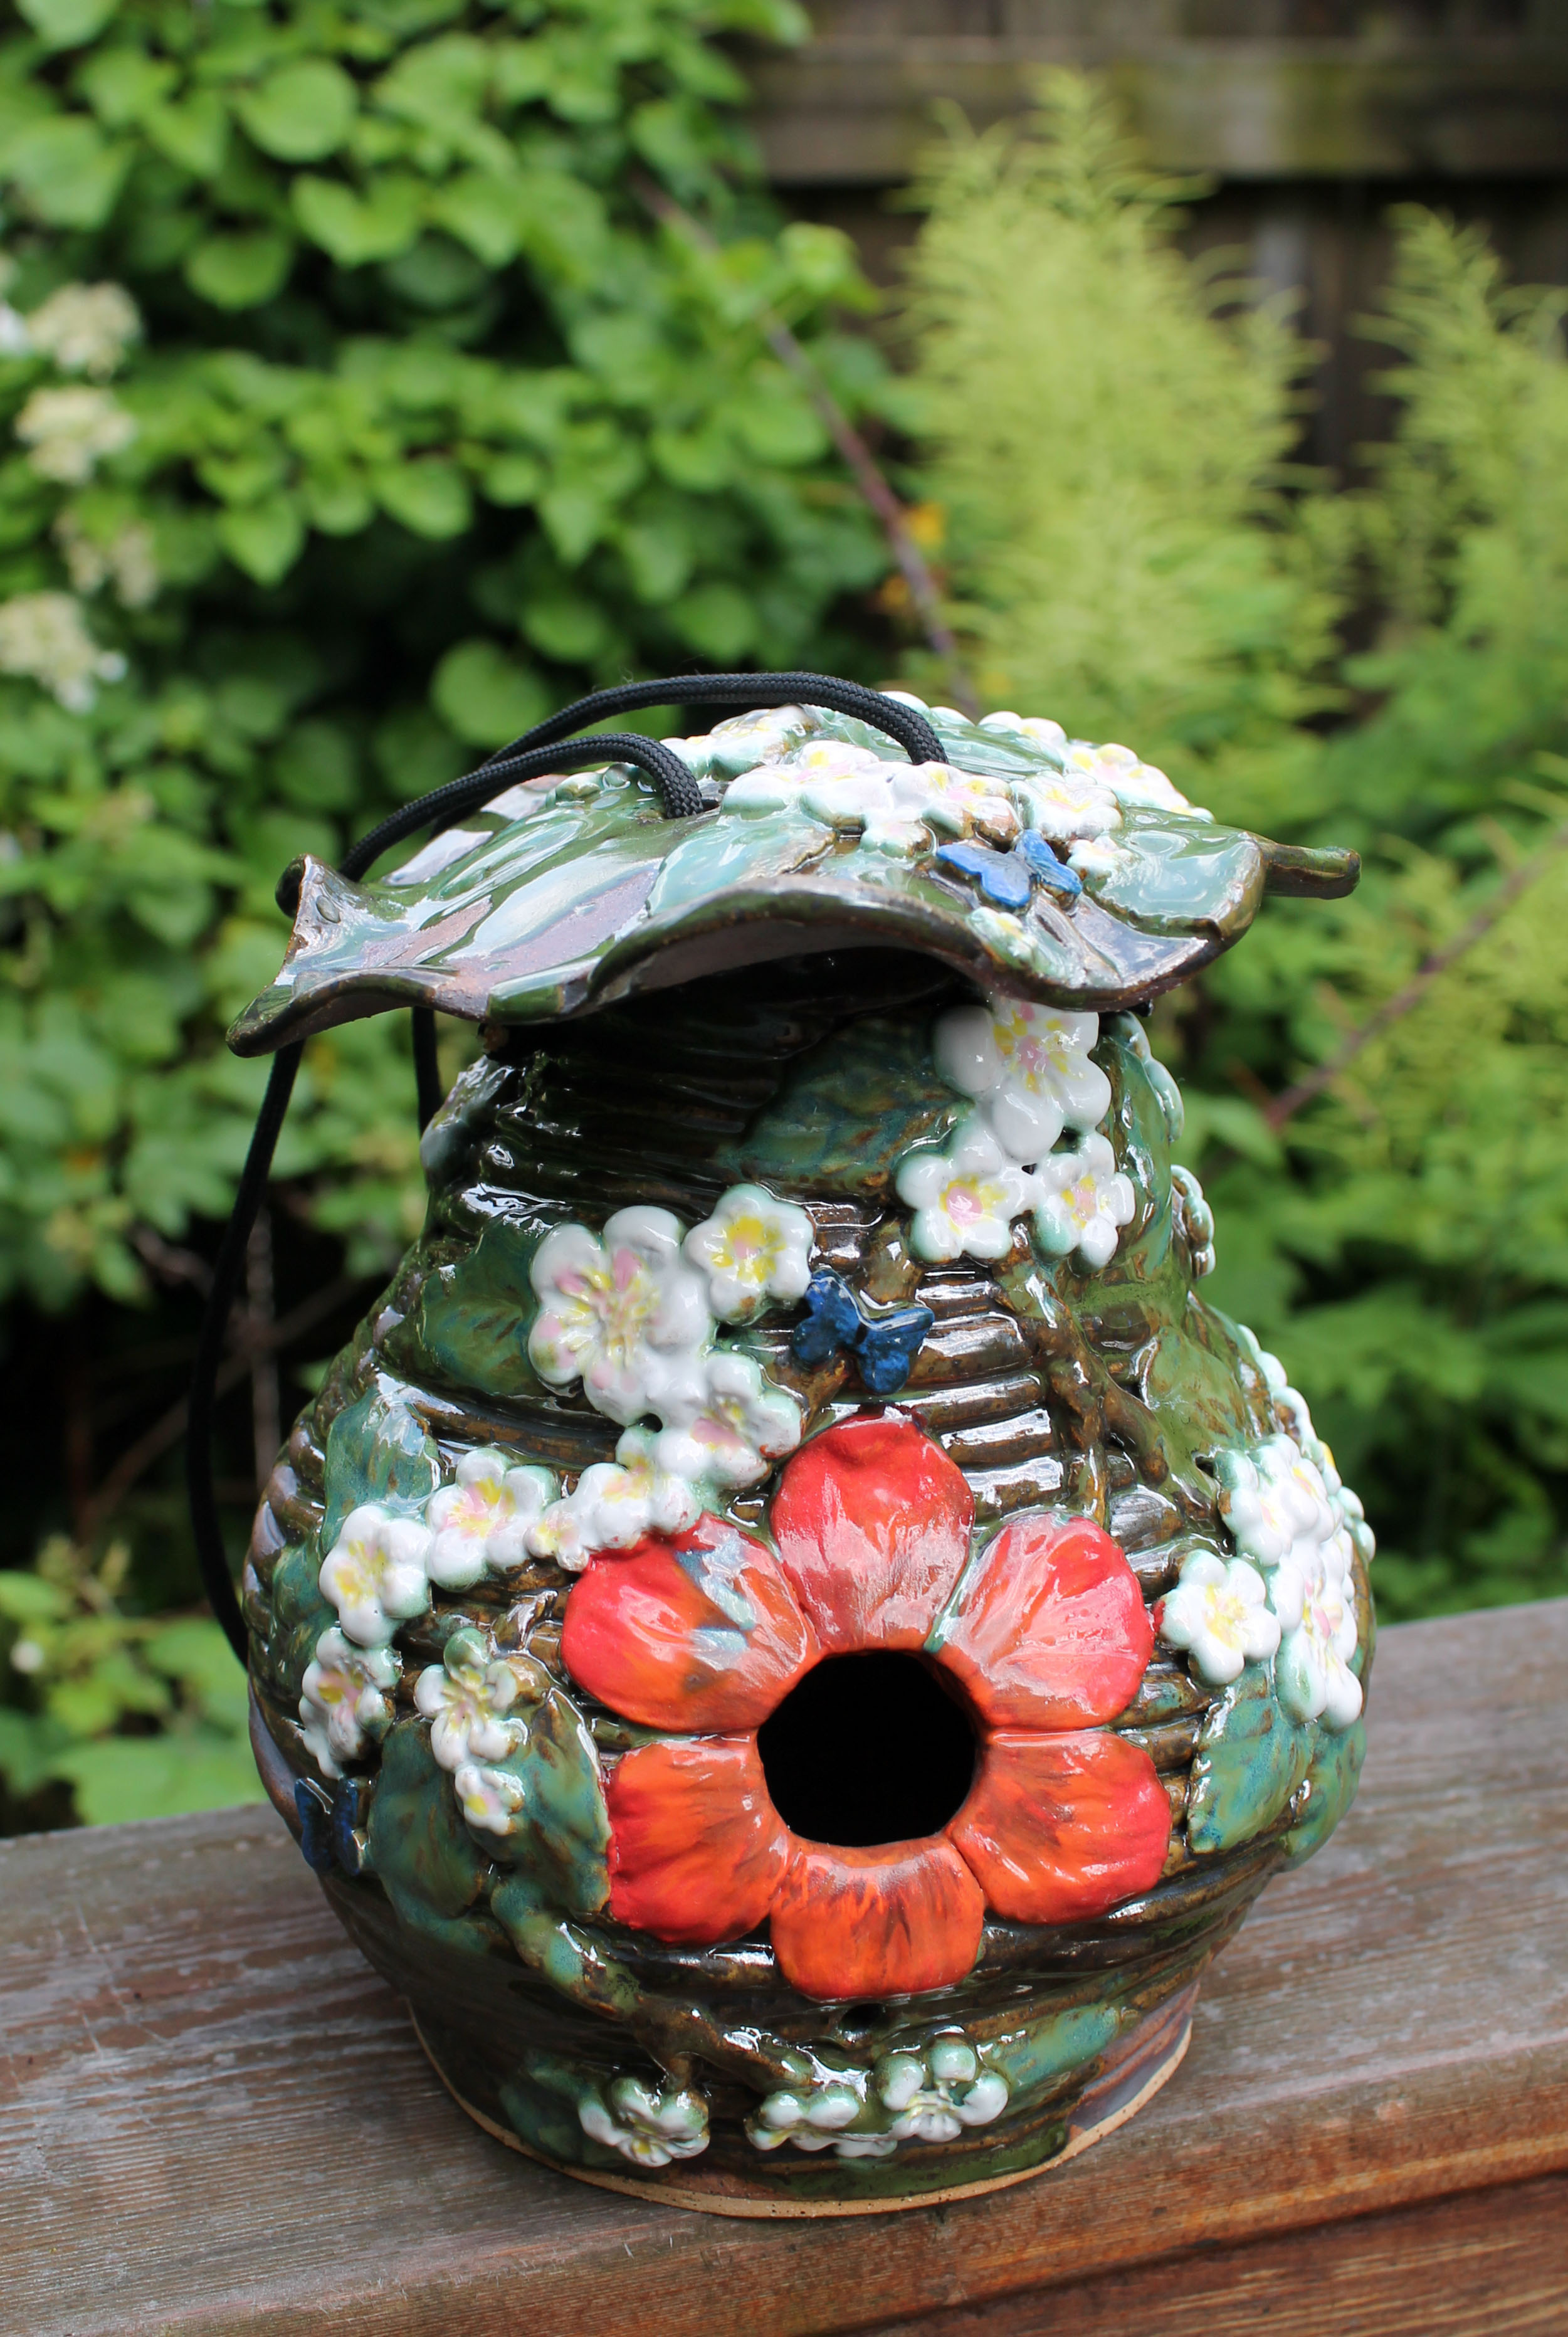
Well, spring is almost done and summer is almost here! I finally glazed up a birdhouse that has been bisque fired and waiting for glaze for almost a year! Sometimes I am just not brave enough. I love how it turned out! It was hand-built with coils in a style that reminds me of an old fashioned beehive. A jaunty looking lid covers the top opening. There is a drainage hole in the bottom. Trailing cherry blossoms and little blue butterflies wrap around. The red flower seems to sprout out from the 1 1/4″ hole in the middle giving the perfect size for a special backyard bird to make a home. It’s about 8″ tall and 7″ wide at the base.
Supply list and directions to make your own are below! If you are interested in purchasing this particular one, please go to my etsy shop, hydeparkhill.etsy.com where you can find this and many other lovely items to beautify your life!
Enjoy your cheery, cherry blossom spring morning!
Eileen
Supplies:Clay: speckled cone 5 clay for main body, b-mix 5 for flowers, leaves and butterflies, Other supplies: cherry blossom fondant mold, leaf shape cookie cutter, 5 petal flower cookie cutter, leaf or petal vein press mold (I used Wilton’s fondant flower molds & vein mold), parachute cord for hanging it up.
Directions: Roll out a 1/4″ thick slab and cut your circle shaped base and cut an uneven wavy shape for the top- curve the sides with your fingers and use newsprint or paper towels to help the up and down curves to keep their shape, cut two holes for the cord about an inch or two apart. Set the top aside to be soft leather hard. Cut a hole in the bottom slab with a 1/4″ hole cutter for drainage, slip and score around the edge and roll out your first coil. Attach your coil and continue to roll and attach coils all the way up to the top- slowly bringing in shape to be more narrow at the top. Let it firm up a bit. Cut a hole 1 1/2″ in the middle of the side of your birdhouse. Cut two holes- one on each side at the top for the cord to be strung through and then through the lid- make sure everything lines up well. Roll a small slab and cut a 5 petal flower, cut the petals apart and give the petals veins with a texture tool or a leaf vein tool. Slip and score and attach your petals around the entrance hole. Using your flower mold and cornstarch, make flowers, branches and leaves attaching them wherever you want all the way around the birdhouse and on the lid. Slip and score and attach butterflies. Cover with plastic and let it sit for a few days. Slowly dry. Bisque fire to cone 05, glaze and fire to cone 5. I used black parachute cord for hanging it up!
It’s a cold, dark January folks! brrrr….. but my garage is warm with my glass kiln going! Here’s hoping spring is here soon!
Supplies: White opal glass, icicle clear glass, silver foil, Tim Holtz wildflowers dies, Justrite paper craft butterfly die, die cutting machine – I used the Grand Calibur- and a glass kiln 🙂
Directions: Cut your white opal glass into 5.5″ square, icicle clear 5.75″ square. Cut your wildflowers from silver foil (NOT silver leaf). Layer your project- white opal glass, wildflowers, arrange your flowers in a pleasing design. Cap with clear and full fuse. Once it has cooled, slump into a dish form. Enjoy!
If you don’t like wildflowers, use a heart, or any other paper crafting die that will fit on your silver foil page. Experiment. 🙂 Silver reacts differently with different colors of glass. With the white glass it turned a pale yellow gold color. With blue glass it turns a pinkish iridescent color. Some samples of mine are below. They are available for purchase on my etsy shop, hydeparkhill.etsy.com
Good morning! What a lovely spring we are having! I have a special mixed media canvas for you today! My husband and I are fond of the song: “Morning has Broken”. It is an old hymn written in 1931 by an English Eleanor Fargeon and was made popular in 1971 when it was recorded by singer Cat Stevens. Later this week I will have tutorial about how to make this project.
What I love about this canvas is the song is literally bursting forth from the inside the canvas. It features the music and lyrics of the hymn and is full of the new “Classic Petunia” from Heartfelt Creations, as well as some glass and pottery elements I made in my ceramic and fused glass studio. It has a fused glass blackbird and the eggs are made from speckled brown clay.
Do you have a favorite song? You could make it into a mixed media canvas! It’s a fun creative project! Imagine the possibilities! Below are the supplies and directions! The directions are a bit long, but most of the “how to” is easy to see. (A picture says a thousand words!) Enjoy!
Other Supplies: 12” x 12” gallery canvas, satin mod podge/brush, acrylic paint- Lime Green and Thao’s Green, White Gesso, thick modeling paste, crackle medium, moss, bird’s nest, eggs, Morning has Broken sheet music, Morning has Broken lyrics laser printed on vellum, Dries Clear Adhesive, Staz-on: Timber Brown Ink, Distress ink: Wilted Violet, Picked Raspberry, Peeled Paint, Mowed Lawn, Squeezed Lemonade, Vintage photo, Black Soot, a fused glass blackbird with 14 gauge copper legs (or craft bird), 140# cold press watercolor paper, Versa-mark watermark ink, charcoal embossing powder, bamboo skewer painted black, floral foam, glue gun, utility knife, heat tool, water brush, patience.
Instructions: Making the canvas takes a bit of time as it has to dry between layers. While it is drying, use your time in between to make your flowers, because there are lots of flowers in this project. Using a 12” x 12” gallery size canvas and using lime green and Thao’s green acrylic paint, paint the sides, back and inside wood by lightly spreading the two colors into each other. Set aside to dry. Choose a 12” x 12” paper from the classic petunia pad and adhere to the front of the canvas using satin mod podge both under and over the paper. Smooth out any air bubbles. You want it perfectly flat and adhered well. On the inside of the canvas glue a copy of the sheet music “Morning has Broken” that was laser printed on white copy paper. (If you use an ink jet printer, the ink will smear when you put glue on it.) When your canvas is dry, coat the outside sides and inside sides with crackle medium. Set aside to dry again. After it is dry, put a thin coat of white gesso all over the front and a bit heavier coat of white on the sides—as the sides dry it should crack leaving an aged texture, with the green showing underneath. Let it completely dry, this takes couple of hours. With heavy modeling paste and a stencil of a branch and bird stencil on the upper right corner of the canvas. Using a brick stencil and modeling paste, stencil a brick pattern on the right hand side below the bird and all the way down the side to the bottom. Use a hexagon stencil for the upper left corner. Set the canvas aside to completely dry. Meanwhile, using watercolor paper stamp and die cut at least 10 sets of the classic petunias- all sizes, color with Distress Inks, spray with water and shape, set them aside to dry. Cut stamens, ink, and roll into shape, coat tips with glue and dip in Prills, set aside to dry. Stamp and die cut v-shaped hanging basket from the Classic Petunia onto watercolor paper using Versa-mark water mark ink and sprinkle with charcoal embossing powder, heat set, and color petunias with ink. Die cut the basket with black cardstock 4 more times and adhere all the layers to the back of the first one. Paint the bamboo skewer black with black acrylic, after it dries glue the basket to the skewer and set aside to dry. Your canvas should be dry by now. (It helps to let it dry overnight before cutting it.) Take a utility knife and carefully cut your canvas- like you are cutting a pie. Roll back the pieces so it looks like it burst open, once bent they will stay that way and the music you glued on the inside will show. In the inside bottom of the canvas secure the floral foam with hot glue and cover with moss. Insert bird, nest, eggs, and bamboo skewer. Prepare your background piece. Cut a 12” x 12“ paper from the Classic Petunia paper pad to 11” x 11”, adhere to a sturdy piece of 11” x 11” chipboard with mod podge, adhere vellum lyrics piece (Put a thin half inch wide line of mod podge along the top and bottom of the vellum and adhere it to the background paper. The vellum will want to wrinkle, don’t get it too wet with the glue. Hot glue the background piece to the back of canvas by putting the hot glue on the wood part of the canvas and lining up the top of the backdrop piece and slowly lay it on the back. Carefully do this, because once it is down with hot glue, it isn’t going to be able to be “adjusted”. Start to decorate the canvas! Arrange flowers as shown all around. I made my fused glass bird from black fusing glass and I made the eggs from speckled clay that left unglazed and I fired to cone 5. Feel free to substitute! You can use a paper bird or a craft bird & craft eggs from a craft store. After it’s all decorated, put on the back hanger. It might not go in the middle because of the weight of different objects. Hang your canvas or set on a shelf and enjoy, a vision of a spring morning bursting forth in song!