Here is a fun fused glass soap dish project using a whimsical fish stamp from Heartfelt Creations! Supplies and directions are as follows! Because of the many specialized tools and products used to make this projects I recommend to do this project at a “Paint your own Pottery & Fused Glass Shop”. You could also to this at a paint your pottery shop with ceramic and your own stamps. Use underglaze with the stamps.
Supplies: A glass kiln, glass cutting tools, glass stamp ink, fusible glass- I used System 96 white opal glass and icicle clear glass, hipster soap dish glass mold (Slumpys.com), glass enamel paint G series non-toxic (from Colors of Earth), colored glass frit, millefiori, glass tac or hairspray
Directions: Cut your glass to fit the size of your mold, clean your glass with rubbing alcohol, prepare your glass stamp ink, using a brayer, roll it onto your stamp, stamp your fish onto your glass. When it’s dry, outline with Colors for Earth outlining black, draw your under the sea leaves, let dry. Fill in the fish and leaves with glass enamel colors of choice, let dry. Sprinkle fine blue sky transparent frit for the water, sprinkle fine light and dark amber transparent frit for the sand, put a few millefiori/murrini for little sea creatures around the plants. Use hairspray or glass tac to keep all your pieces in place. Put in kiln, fire to a full fuse. Put in hipster soap dish and slump into the soap dish shape. What a fun project! If you are feeling super creative, make your own soap to fill your dish! 🙂
Good morning! What a lovely spring we are having! I have a special mixed media canvas for you today! My husband and I are fond of the song: “Morning has Broken”. It is an old hymn written in 1931 by an English Eleanor Fargeon and was made popular in 1971 when it was recorded by singer Cat Stevens. Later this week I will have tutorial about how to make this project.
What I love about this canvas is the song is literally bursting forth from the inside the canvas. It features the music and lyrics of the hymn and is full of the new “Classic Petunia” from Heartfelt Creations, as well as some glass and pottery elements I made in my ceramic and fused glass studio. It has a fused glass blackbird and the eggs are made from speckled brown clay.
Do you have a favorite song? You could make it into a mixed media canvas! It’s a fun creative project! Imagine the possibilities! Below are the supplies and directions! The directions are a bit long, but most of the “how to” is easy to see. (A picture says a thousand words!) Enjoy!
Other Supplies: 12” x 12” gallery canvas, satin mod podge/brush, acrylic paint- Lime Green and Thao’s Green, White Gesso, thick modeling paste, crackle medium, moss, bird’s nest, eggs, Morning has Broken sheet music, Morning has Broken lyrics laser printed on vellum, Dries Clear Adhesive, Staz-on: Timber Brown Ink, Distress ink: Wilted Violet, Picked Raspberry, Peeled Paint, Mowed Lawn, Squeezed Lemonade, Vintage photo, Black Soot, a fused glass blackbird with 14 gauge copper legs (or craft bird), 140# cold press watercolor paper, Versa-mark watermark ink, charcoal embossing powder, bamboo skewer painted black, floral foam, glue gun, utility knife, heat tool, water brush, patience.
Instructions: Making the canvas takes a bit of time as it has to dry between layers. While it is drying, use your time in between to make your flowers, because there are lots of flowers in this project. Using a 12” x 12” gallery size canvas and using lime green and Thao’s green acrylic paint, paint the sides, back and inside wood by lightly spreading the two colors into each other. Set aside to dry. Choose a 12” x 12” paper from the classic petunia pad and adhere to the front of the canvas using satin mod podge both under and over the paper. Smooth out any air bubbles. You want it perfectly flat and adhered well. On the inside of the canvas glue a copy of the sheet music “Morning has Broken” that was laser printed on white copy paper. (If you use an ink jet printer, the ink will smear when you put glue on it.) When your canvas is dry, coat the outside sides and inside sides with crackle medium. Set aside to dry again. After it is dry, put a thin coat of white gesso all over the front and a bit heavier coat of white on the sides—as the sides dry it should crack leaving an aged texture, with the green showing underneath. Let it completely dry, this takes couple of hours. With heavy modeling paste and a stencil of a branch and bird stencil on the upper right corner of the canvas. Using a brick stencil and modeling paste, stencil a brick pattern on the right hand side below the bird and all the way down the side to the bottom. Use a hexagon stencil for the upper left corner. Set the canvas aside to completely dry. Meanwhile, using watercolor paper stamp and die cut at least 10 sets of the classic petunias- all sizes, color with Distress Inks, spray with water and shape, set them aside to dry. Cut stamens, ink, and roll into shape, coat tips with glue and dip in Prills, set aside to dry. Stamp and die cut v-shaped hanging basket from the Classic Petunia onto watercolor paper using Versa-mark water mark ink and sprinkle with charcoal embossing powder, heat set, and color petunias with ink. Die cut the basket with black cardstock 4 more times and adhere all the layers to the back of the first one. Paint the bamboo skewer black with black acrylic, after it dries glue the basket to the skewer and set aside to dry. Your canvas should be dry by now. (It helps to let it dry overnight before cutting it.) Take a utility knife and carefully cut your canvas- like you are cutting a pie. Roll back the pieces so it looks like it burst open, once bent they will stay that way and the music you glued on the inside will show. In the inside bottom of the canvas secure the floral foam with hot glue and cover with moss. Insert bird, nest, eggs, and bamboo skewer. Prepare your background piece. Cut a 12” x 12“ paper from the Classic Petunia paper pad to 11” x 11”, adhere to a sturdy piece of 11” x 11” chipboard with mod podge, adhere vellum lyrics piece (Put a thin half inch wide line of mod podge along the top and bottom of the vellum and adhere it to the background paper. The vellum will want to wrinkle, don’t get it too wet with the glue. Hot glue the background piece to the back of canvas by putting the hot glue on the wood part of the canvas and lining up the top of the backdrop piece and slowly lay it on the back. Carefully do this, because once it is down with hot glue, it isn’t going to be able to be “adjusted”. Start to decorate the canvas! Arrange flowers as shown all around. I made my fused glass bird from black fusing glass and I made the eggs from speckled clay that left unglazed and I fired to cone 5. Feel free to substitute! You can use a paper bird or a craft bird & craft eggs from a craft store. After it’s all decorated, put on the back hanger. It might not go in the middle because of the weight of different objects. Hang your canvas or set on a shelf and enjoy, a vision of a spring morning bursting forth in song!
Ah…. love! Pretty soon wedding season will be upon us! Get ready by having a gorgeous card available! Tulle, lace, feathers, roses, what’s not to love?!?! Here is one that I made recently as part of my application for the Heartfelt Creations Design Team! It’s an elegant, amazing easel card! Easel cards always surprise people! They aren’t hard to make, but the wow factor in giving them is priceless! This one features two Heartfelt Creations doves and a cascade of flowers from the new Flowering Dogwood Collection and my own special addition, a secret special message pocket on the back.
I wanted the look to be soft and romantic and I wanted the focal point to be the doves. Because of this, I made simple flowers and vines with no stamping details and no stamens in the flowers. I water colored them with Memento Ink and Distress Ink. The doves are stamped with jet black Staz-On ink and backed with real feathers. So without further delay: Supplies, directions and more photos are below!
5” x 7” Wedding Easel Card
Supplies: HFC Classic Rose stamps and Dies, Classic Rose Vines Die, Regal Borders and Pocket dies, Flowering Dogwood and Doves stamp and dies, Snow Kissed Tag Die, Heart die (discontinued), dries clear adhesive, hot glue, Cold Press 140# watercolor paper (I use Strathmore), 110# White cardstock, Candlelight paper, Memento Ink: Angel Pink, Distress Ink: Mowed Lawn, Vintage Photo, Picked Raspberry, Staz-On Jet Black ink, a variety of lace, chalk white seam binding ribbon, white rose ribbon, feathers, white tulle, baroque stencil, modeling paste, super fine cool white glitter, scoreboard, paper trimmer, die cutting machine, flower shaping tool, water brush, one inch hole punch, distress tool
Directions: Cut one 4.5″ x 6″ piece of watercolor paper and stencil baroque pattern on it with stencil, modeling paste and pallet knife. Carefully remove stencil from paper and sprinkle with super fine glitter. Set aside to dry. Assemble an easel card: Cut a 5”x 7” hinged at the top card base from heavy weight 110# white cardstock. Score top piece in half and bend forward. Cut one piece of 5” x 7” heavy weight 110# white cardstock, adhere to bottom half of folded piece- you now have your easel card base. Cut 3 pieces 5” x7” of candlelight paper. Adhere to top panel and bottom inside panel and underside of the folded panel. Cut classic rose shapes from watercolor paper to make 7 flowers (1 large, 2 medium, 4 small) Color middles with Angel Pink Memento Ink. Shape while wet and set aside to dry. Cut 3 classic rose vines from watercolor paper, color with Mowed Lawn Distress Ink and a water brush. Shape and set aside to dry. Cut one Regal Border from Candlelight Paper and glue to front panel layer. Measure and cut ribbon and lace, adhere to front panel and front of bottom panel. Distress the stenciled piece by tearing off the bottom at an angle and distressing all sides and layer on card front with adhesive. (I use an electric “distress it all” tool) Using watercolor paper, stamp and cut out two doves using Staz-On jet black ink, adhere white feathers to the backside with hot glue. Cut the heart out three times and glue them together, the top layer should be candlelight paper, the under layers can be basic white cardstock. Cut cascading dogwood flower and color with water brush and distress ink. Assemble flowers, cut apart rose vines. Make a triple bow from white tulle, adhere with hot glue. Adhere everything else as shown.
Final optional step: Make a personal message pocket on the back space. Cut a piece of candlelight paper 3 ½” x 5” and using a one inch hole punch cut a half circle from the right side of the 3.5” length. Decorate with die cut of choice, flowers, vines and lace, then adhere to the back of the card (see picture). Cut a tag from Snow Kissed Tag Die, use seam binding ribbon through the hole on the tag to help put it in and out of the pocket. Write your personal message and put the tag back in. Now give it someone special for their special day!
Happy Crafting!
Eileen
PS: candlelight paper can be found at Michael’s craft stores.
What?? Paper craft and Fused Glass? How does that work?? Doesn’t the paper burn up? How do you get your stamped image to stay on the glass?
I have been fusing glass for about a year now and it started with wanting to make glass koi fish for my son’s pond bathroom (see the finished bathroom here https://hydeparkhill.com/2016/10/12/pottery-adventures-part-2/ ) it was a pottery and glass adventure! Now I am making glass dishes and glass ornaments, glass pendants, and glass this and that and the more I do, the more I want to combine it with my paper crafting skills so here are some of my pieces. 🙂 Check out my hydeparkhill.etsy.com shop! (link on the side bar)
Supplies I used: System 96 Icicle Clear fusing glass 12″ x 6″ piece cut in half, glass slumping mold (I used one from Delphi Glass called “Sweet Treat” it’s a 7 x 7 mold), Papyros glass fusing fiber paper, mold release spray, white high temperature enamel, snowflake stamps and die from the Snow Kissed Collection from Heartfelt Creations, die cutting machine, glass kiln.
Directions: Cut a piece of glass fusing fiber paper with the large snowflake die. Putting a piece of wax paper between the fiber paper and the die will help the fiber paper to come out easier. Fiber paper is more fragile than regular paper and you don’t want it to rip. Follow the directions for mixing the enamel to stamp. (There is a good video about glass stamping on Slumpys.com) Using a brayer, apply the sticky enamel to the stamp, be careful not to put too much on and stamp the top piece of glass with random snowflakes, leaving the space in the middle of the glass blank. On your kiln shelf layer a 7″ x 7″ piece of fiber paper, then the snowflake cut from fiber paper, next the blank piece of glass, the stamped piece of glass and put it into your glass kiln. Set for a full fuse. If you need a fusing schedule, please leave a comment and I will be happy to share mine with you. After it is fully fused, leave the die cut in the bottom of the glass, place the fully fused piece on top of your slump mold. Fuse to a slump temperature. When your kiln is below 100 degrees take it out and enjoy! The snowflakes are now a permanent part of the glass and will not wash off.
Below are some other versions I made with different dies! I think the results are stunning! The creative aspect of possibilities is absolutely endless. The bottom picture shows the gentle slope of the dish. Perfect for dessert, appetizers, a hostess gift, candy, endless possibilities! Enjoy!
Here is a lovely pink, black and white card! This card features die cuts from Cheery Lynn and Heartfelt Creations!
Materials: Cardstock- white, black, pink and black glitter, embossing folder, Cheery Lynn Scandinavian Oval, Just for you Oval, flourishes, Heartfelt Creations Arianna Blooms, adhesive, black bling. Distress ink: picked raspberry, Versamark watermark ink
Instructions: Cut an A2 card base from white cardstock, (5.5″ x 4.25″) cut black mat (5.25″ x 4.0″), cut pink mat (5.0 ” x 3.75″) and emboss with folder of your choice. On white cardstock: stamp Arianna blooms flowers twice with watermark Versamark, sprinkle with white embossing powder, heat set. Color with picked raspberry distress ink, cut out, shape, set aside to dry. Meanwhile, cut the doily, sentiment and layer with adhesive. Cut black and white mat for inside.
Today I have a mixed media piece to share with you! This piece was created with ceramic stoneware clay, watercolor paper, ink, adhesive, pearl faux bling, and is mounted on a 1 3/4″ thick piece of cedar board.
The process to make this piece was a bit long, but worth it! First, I slab rolled a piece of B-mix clay and put it on a dry wall board. Next, I took my hand drawn heart pattern and put it on the clay and traced it, then pressed in letters, stamps and foam letters into the heart to make the words. Carefully, I cut it into pieces, but left it on the board and didn’t pick the pieces up. I let it dry in a wet room for a few days with a dry wall board on top of it. I took it out of the wet room and cleaned up all the pieces and continued to let it slowly dry for another week. All the pieces with words were carefully under glazed with dark grey and then all of it was bisque fired to cone 05. After the bisque fire, the cross was glazed with Temmoku (Amaco Potter’s Choice), the word pieces were clear glazed and it was all fired to cone 5. I used E6000 adhesive to glue my heart to the cedar board.
All the flowers were made from 140# cold press watercolor paper. I used Spellbinders Rose Creations die and rose leaf die and Heartfelt Creations classic leaves with matching stamp, and a Cheery Lynn flourish. All the flower layers were spritzed with water and then sponged with “picked raspberry”, “antique linen”, and edged with “vintage photo” Distress Ink. They were shaped while they were wet with a bone folder and stylus tool and allowed to dry before assembling into flowers. Vellum stamens were made using a McGill paper punch, faux pearls were added to the centers of each flower. The Spellbinders leaves were die cut, the Heartfelt Creations leaves were stamped onto the watercolor paper then die cut and inked with “peeled paint, mowed lawn and forest moss” Distress Ink. I used hot glue to glue all the flowers together and to glue the pieces to the cedar board. I did a “dry run” to figure out where I wanted everything before I started gluing.
This project is based on: Philippians 1:6 “He who began a good work in you will be faithful to complete it.” I wanted to express how the Holy Spirit works in our hearts to complete us. First beginning at the center of our hearts, with the two things Jesus said were the most important: A relationship with God-Love God and a relationship with others -Love Others. They are connected and possible because of what Jesus did for us on the cross. All the other character qualities coming from our hearts and lived out in our lives are a result of the Holy Spirit working to complete us.
I did this project for an art show at RiverGlen Christian Church in Waukesha, Wisconsin.
Here is a new favorite card I made this week, a friendship garden card. It’s a step card which makes it possible to add more details and depth than a regular flat 5 x7 or something. 🙂 Using a step card die from Cheery Lynn makes this step card a breeze to create! There is no more endless measuring and cutting and scoring as the die does it all for you. Of course I used botanical rose stamp and die from Heartfelt Creations, it’s my favorite flower die and stamp set. I love the little birdies that come with this set too! Supplies and directions are below! 🙂
Supplies: Cheery Lynn step card die, Heartfelt Creations Botanical Rose stamp and die, birds and blossoms, Heartfelt Creations classic leaves, Sue Wilson Stockholm, Justrite garden sentiment, Justrite leafy background die, 110# white cardstock for the step card base, turquoise Recollections cardstock for accents, pearl shimmer paper, Distress Ink- persimmon, mowed lawn, Staz-on Black ink, vellum, flower shaping tools, adhesive, imagination
Directions: Cut step card base and other pieces, stamp, color and cut flowers, leaves, birds, stamp background, cut out Stockholm piece three times and glue together, cut vellum piece and stamp, attach to Stockholm. Arrange flowers, leaves, sentiment etc and adhere. Enjoy!
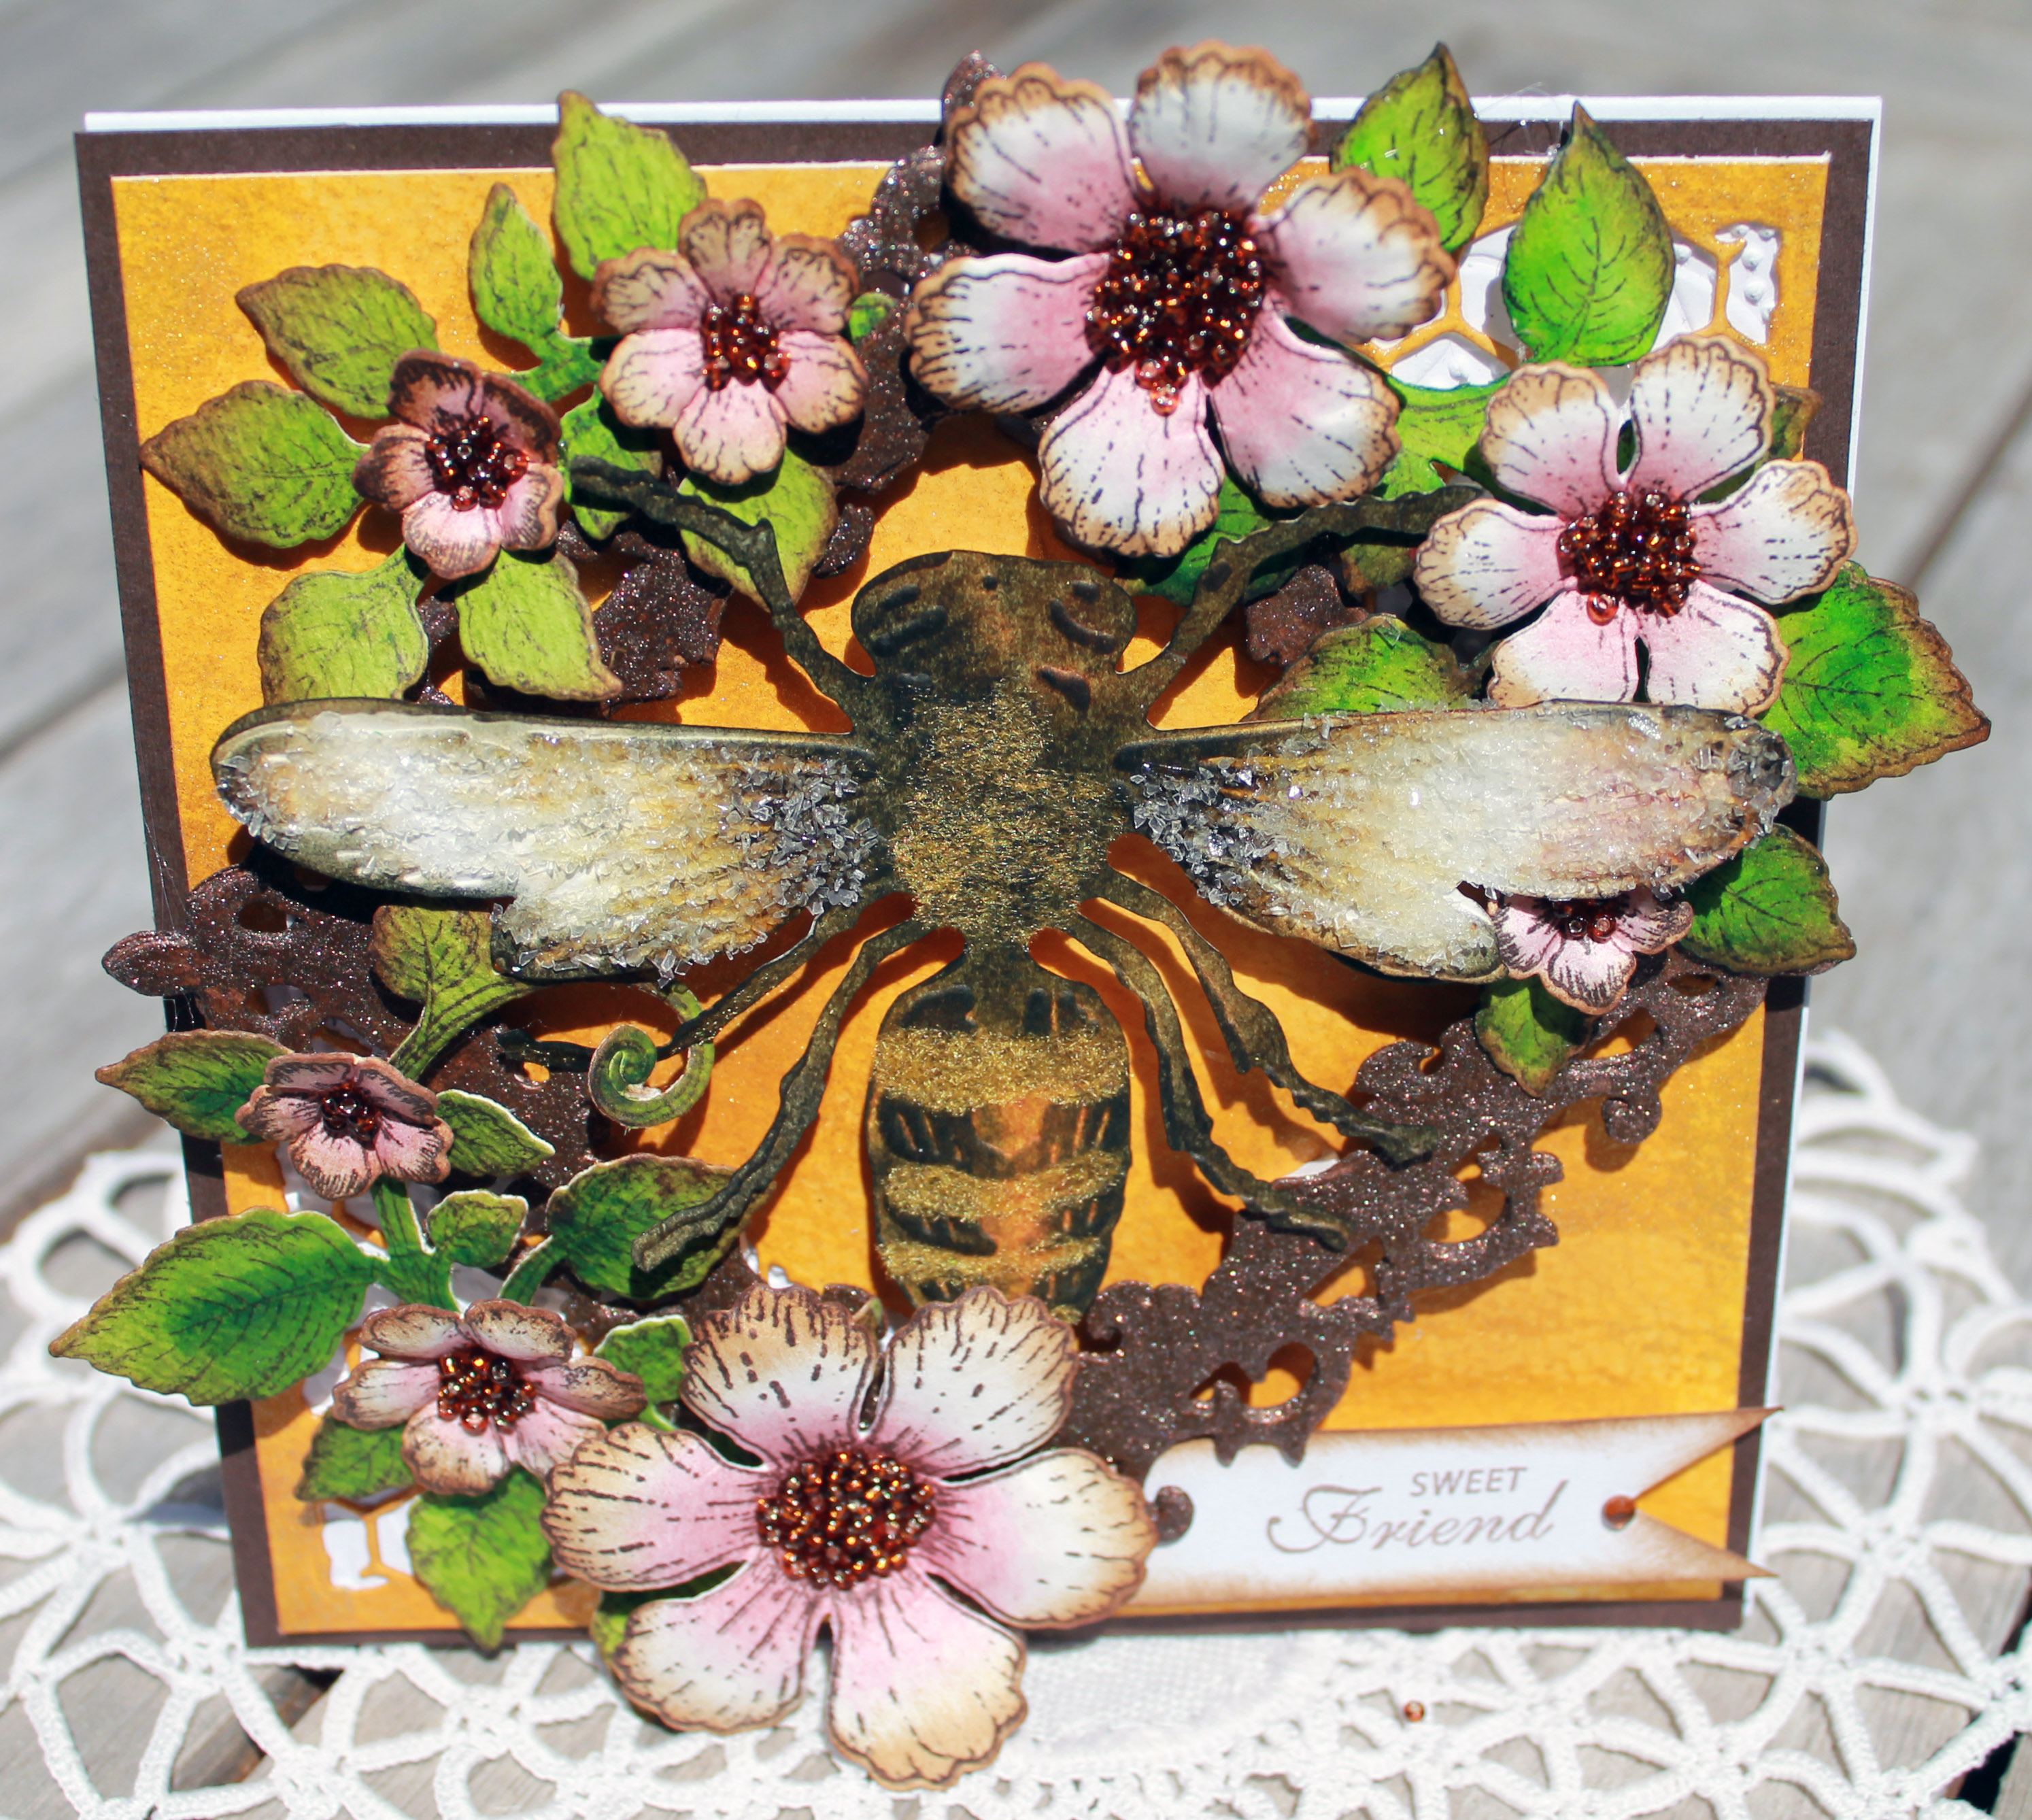
Here is a sweet card! Two versions of the same card— one that says “just because” and another that says “Sweet Friend”. Both card have the same features- a beautiful arrangement of flowers and a large honeybee. The perfectly sweet way to say hello to your friend, near or far. Available in my Etsy shop, HydeParkHill. 🙂 enjoy !
Supplies: 6″ x 6″ white cardstock base, dark brown cardstock (for matting), 5.5 square of 140# cold press watercolor paper, Tim Holtz honey bee die and texture embossing folder, Honeycomb die from Tim holtz mixed media dies, Heartfelt Creations Bontanic Rose stamp and matching die, Heartfelt Creations classic leaves stamp and matching die, Heartfelt Creations Blossoms & Birds collection small flowers. Spellbinders frame, embellishments- seed beads, yellow flower soft, broken glass glitter, brown walnut stamp paint, Distress Ink: honey, Vintage Photo, Victorian velvet, mowed lawn, peeled paint, black soot, walnut stain, Staz-on Timber brown ink
Directions: Cut a 5.5″ x 5.5″ card base from white 110# cardstock, this will make a strong base for card. Cut your dark brown cardstock for two matts 5.25″ x 5.25″, cut a white inside matt of 5″ x 5″. Cut a 5″ x 5″ piece of watercolor paper. Cut the honeycomb die from the top left and bottom right of the watercolor square. Color this piece with honey ink and edge with some vintage photo ink. Set aside to dry. Cut your bee and emboss with the texture matt. color the body with black soot and walnut stain ink. Color the wing edges with vintage photo and then lightly with some walnut stain. Put some “dries clear glue” on the body on the stripes and sprinkle with yellow flower soft. put glitter on the wings. Set aside to dry. Stamp your flowers on watercolor paper with Staz-on.timber brown ink Color the middles of your flowers with Victorian velvet. Cut our your flowers and edge with vintage photo and shape. Stamp the largest classic leaves stamp with brown and color with mowed lawn and peeled paint, die cut and then edge the leaves with vintage photo. Cut two frames from Spellbinders, glue together or use a chipboard frame. Coat with brown stamp paint. Set aside to dry. Assemble your layers inside your card and outside on the front. Add dimensional foam to your frame and bee and attach. Hot glue your flowers to the leaves and fill with centers of flowers with seed beads. Add your sentiment! Done! Enjoy!


 Hello Everyone!