Posted on Leave a comment

Thank you!

Persimmon thank you full frontThank you! Here is a bright and cheery, beautiful card that started with a piece of watercolor paper that was letter pressed in an embossing folder. Add some die cuts, a foamiran flower or two and done! Supplies and directions are below!

Supplies: 5″ x 7″ White cardstock card base, 140# cold press watercolor paper, vellum, Distress Ink: Ripe Persimmon and Wild Honey, embossing folder, JustRite leaf die cuts, Cheery Lynn swirl die cuts, Magnolia leaf die cuts, Sue Wilson Thank you die and Stockholm die, sewing machine, upholstery thread, distress it all machine, white tulle, pearl brad, flower stamens, white foamiran, flower petal die cut

Directions: Spritz your  watercolor paper with water, ink up one side of the inside of your embossing folder, gently close it, run it through your machine (I used a Grand Calibur) Set it aside to dry. cut your flowers, ink the edges with the DI, shape, assemble, cut all other die cut pieces. Cut “thank you die” three times from heavy paper and glue them together to make it stronger and stand out more. Back it with vellum. Distress your watercolor letter press piece and sew a double line around the edge about a 1/4 inch in. Hot glue some lace along the top. Use foam dimensional tape to make your watercolor piece stand out from the card base and use foam dimensional squares for your “Thank you” focal piece. Attach your flowers and leaves and tulle arranging them however you want. I used hot glue. Double matt the inside. 🙂

Give to a special friend to say “Thank you!” If you don’t want to make your own, this one is available in my Etsy shop, Hyde Park Hill .

Happy Crafting!

Eileen

Posted on Leave a comment

Birthday Wishes

Good morning! Today I have a “birthday wishes” card for you! The paper is gorgeous and is from the newly re-designed Lemoncraft “House of Roses” set. Instead of making my own flowers for this one, I used a variety of white, pink and pink/white mulberry flowers, with foliage from Cheery Lynn dies. This card is full of sweet, old fashioned beauty and is available in my Etsy shop, HydeParkHill.etsy.com!

Supplies and directions are below! Have a beautiful day!

Enjoy!

Eileen

birthday wishes pink and white full front view

Supplies: House of Roses 6″ x 6″ paper pad from Lemoncraft, mulberry flowers, clock face, birthday wishes die and leaves from Cheery Lynn, Prima Marketing Doily die cut, 110# white cardstock, 80# white cardstock, adhesive- both hot glue and dries clear liquid, dimensional foam, faux pearls, peeled paint Distress Ink, faux rhinestones, lace, distress-it all machine.

Directions: Using heavy white cardstock, make a 5.5″ square card base, select two pieces of complimentary paper from “House of Roses” paper pad, distress the edges. Cut your die pieces. Color leaves using a foam applicator with peeled paint ink. Layer all pieces with foam dimensional tape, decorate with flowers, leaves, lace, pearls, and rhinestones.


Posted on 1 Comment

Just for you!

Good morning everyone!

Here is a lovely pink, black and white card! This card features die cuts from Cheery Lynn and Heartfelt Creations!

Materials: Cardstock- white, black, pink and black glitter, embossing folder, Cheery Lynn Scandinavian Oval, Just for you Oval, flourishes, Heartfelt Creations Arianna Blooms, adhesive, black bling. Distress ink: picked raspberry, Versamark watermark ink

Instructions: Cut an A2 card base from white cardstock, (5.5″ x 4.25″) cut black mat (5.25″ x 4.0″), cut pink mat (5.0 ” x 3.75″) and emboss with folder of your choice. On white cardstock: stamp Arianna blooms flowers twice with watermark Versamark, sprinkle with white embossing powder, heat set. Color with picked raspberry distress ink, cut out, shape, set aside to dry. Meanwhile, cut the doily, sentiment and layer with adhesive. Cut black and white mat for inside.

Assemble flowers, assemble card! Done! Easy Peezy! 🙂

Have a beautiful day!

Eileen


Posted on Leave a comment

Pieces of My Heart

Hello everyone!

Today I have a mixed media piece to share with you! This piece was created with ceramic stoneware clay, watercolor paper, ink, adhesive, pearl faux bling, and is mounted on a 1 3/4″ thick piece of cedar board.

img_6692

The process to make this piece was a bit long, but worth it! First, I slab rolled a piece of B-mix clay and put it on a dry wall board. Next, I took my hand drawn heart pattern and put it on the clay and traced it, then  pressed in letters, stamps and foam letters into the heart to make the words. Carefully, I cut it into pieces, but left it on the board and didn’t pick the pieces up. I let it dry in a wet room for a few days with a dry wall board on top of it. I took it out of the wet room and cleaned up all the pieces and continued to let it slowly dry for another week. All the pieces with words were carefully under glazed with dark grey and then all of it was bisque fired to cone 05. After the bisque fire, the cross was glazed with Temmoku (Amaco Potter’s Choice), the word pieces were clear glazed and it was all fired to cone 5. I used E6000 adhesive to glue my heart to the cedar board.

All the flowers were made from 140# cold press watercolor paper. I used Spellbinders Rose Creations die and rose leaf die and Heartfelt Creations classic leaves with matching stamp, and a Cheery Lynn flourish.  All the flower layers were spritzed with water and then sponged with “picked raspberry”, “antique linen”, and  edged with “vintage photo” Distress Ink. They were shaped while they were wet with a bone folder and stylus tool and allowed to dry before assembling into flowers. Vellum stamens were made using a McGill paper punch, faux pearls were added to the centers of each flower. The Spellbinders leaves were die cut, the Heartfelt Creations leaves were stamped onto the watercolor paper then die cut and inked with “peeled paint, mowed lawn and forest moss” Distress Ink. I used hot glue to glue all the flowers together and to glue the pieces to the cedar board. I did a “dry run” to figure out where I wanted everything before I started gluing.

This project is based on: Philippians 1:6 “He who began a good work in you will be faithful to complete it.” I wanted to express how the Holy Spirit works in our hearts to complete us. First beginning at the center of our hearts, with the two things Jesus said were the most important: A relationship with God-Love God and a relationship with others -Love Others. They are connected and possible because of what Jesus did for us on the cross. All the other character qualities coming from our hearts and lived out in our lives are a result of the Holy Spirit working to complete us.

I did this project for an art show at RiverGlen Christian Church in Waukesha, Wisconsin.

Here are some more photos of this project!

img_6692img_6674img_6694img_6693img_6673img_6698img_6696

Have a beautiful day!

Eileen

Posted on Leave a comment

Friendship Garden

Hi Everyone!

Here is a new favorite card I made this week, a friendship garden card. It’s a step card which makes it possible to add more details and depth than a regular flat 5 x7 or something. 🙂  Using a step card die from Cheery Lynn makes this step card a breeze to create! There is no more endless measuring and cutting and scoring as the die does it all for you. Of course I used botanical rose stamp and die from Heartfelt Creations, it’s my favorite flower die and stamp set. I love the little birdies that come with this set too! Supplies and directions are below! 🙂

persimmon friendship garden front view

Supplies: Cheery Lynn step card die, Heartfelt Creations Botanical Rose stamp and die, birds and blossoms, Heartfelt Creations classic leaves, Sue Wilson Stockholm, Justrite garden sentiment, Justrite leafy background die, 110# white cardstock for the step card base, turquoise Recollections cardstock for accents, pearl shimmer paper, Distress Ink- persimmon, mowed lawn, Staz-on Black ink, vellum, flower shaping tools, adhesive, imagination

Directions: Cut step card base and other pieces, stamp, color and cut flowers, leaves, birds, stamp background, cut out Stockholm piece three times and glue together, cut vellum piece and stamp, attach to Stockholm. Arrange flowers, leaves, sentiment etc and adhere. Enjoy!

Have a beautiful week my friends,

Eileen


Posted on Leave a comment

Happy Anniversary!

anniversary easel card front view


Hi Everyone!

Wow, time flies! I have been busy with my Farmers’ Market Booth ! Now, that is done, and my card shop is decimated, (which I think is a good thing!) it’s time to start creating some new, beautiful cards!

This wasn’t a difficult card to make, but it was difficult to decide HOW to decorate it!

Supplies: 5 x7 hinge card, Rose creations dies, spellbinder rose leaf die, Sue Wilson maiden fern die, Sizzix ornate distressed frame, chipboard (cereal box) rhinestone bling, watercolor paper- 140# cold press 2 pieces cut 5 x7, pearl shimmer paper- 2 pieces cut 5 x7 distressed edges, rose leaves, prima baroque stencil, heart stencil, embossing paste, anniversary stamp- I used a justrite stamp. Staz-on black ink, vellum, white seam binding ribbon, hot glue.

Directions: Make a 5 x7 hinge card, then fold top half in half to make the easel. Cut one more piece of cardstock 5 x 7 glue to folded portion and it will stand up to make the front of the card. Use the baroque stencil to stencil the 2 5 x7  panels of watercolor paper, set aside to dry. Cut your roses from watercolor paper, ink the middles with spun sugar, shape with a bone folder, assemble with hot glue. Cut your leaves ink with peeled paint. Stamp Happy Anniversary with Staz-on black ink, set aside to dry. Cut two frames from chipboard, glue together, cut one frame with silver cardstock and glue on top. brush with some white acrylic paint to dull the silver a bit. Assemble the card as shown in the pics. Insert a bow made from seam binding ribbon.

The pocket on the back of the card was made with a leftover rose and some paper. I stenciled the heart, cut the paper to fit the space and cut another one to make the pocket. Use a 1 inch hole punch to make a half circle punch for sliding the card in and out. Cut a piece of cardstock to fit inside, hole punch, put on some ribbon, glue a flower and some leaves. Insert into the pocket. Glue the pocket on the back of the card.  Enjoy!

Have a beautiful day!

Eileen

anniversary easel card sideviewanniversary easel card top side viewanniversary easel card close up roseanniversary card back pull out card for signing

Posted on 3 Comments

80th Birthday!

Hi Everyone,

It was my mom’s 80th birthday this past weekend! I wanted to make a beautiful easel card for her. I haven’t made many of these types of cards, so deciding the shape was a bit time consuming! So many options!! Here it is!!

Supply list: Spellbinders grand labels 4, 110 # white cardstock for base and fold parts to make it sturdy. Candlelight/pearl cardstock layer, vellum layer with Swiss dot embossing, tulle layer, Lemon Craft -House of Roses paper for final top layer with matching rose embroidered ribbon, Tim Holtz frame- 2 pieces of chipboard (cereal box) with a layer of white cardstock, 140# cold press watercolor paper, Spellbinders (SB) rose creations die, SB rose leaf die, Sizzix number strip, Cheery Lynn fish banner, Recollections pearl bling. Distress Ink: Peeled Paint, vintage photo, picked Raspberry, spun sugar, antique linen. Staz-on ink: Jet Black. Dries clear adhesive, hot glue. Imagination. 🙂

Directions: Cut all your layers- two of each with whatever base shape and paper you decide. I have four layers. Make a hinged base layer, score the top layer of the base and fold in half. Cut all your roses from watercolor paper, spray lightly with water and ink with distress inks using a foam pad. Using a water brush and peeled paint and vintage photo, ink all your leaves. Let all your pieces dry. Cut your frame pieces and assemble, darken the edges with vintage photo ink. Cut two sets of numbers and layer them (bottom layer plain cardstock, top layer candlelight pearl cardstock) put foam dots on back to give height. Attach to card. Stamp sentiment on vellum, dry with heat tool. Cut with fish banner die from Cheery Lynn and attach. Shape and assemble roses with hot glue. Arrange leaves and flowers, then adhere with hot glue. Attach pearl bling. Cut one more piece and attach to back of card to write a special note and you are done! 🙂

I am entering this card in “Happy Birthday” Dies R Us Challenge  http://diesruschallenge.blogspot.com/?mc_cid=f82eef303c&mc_eid=e69a1bb331

Enjoy your week!

Eileen

IMG_6132

IMG_6130IMG_6129

Posted on Leave a comment

Wedding Gatefold Card

Hi Everyone! Summer wedding season is just around the corner! Here is a gatefold wedding card to celebrate the special once in a lifetime (hopefully) occasion! The supply list and directions are at the end of this post.

Wedding Black and White Gatefold smaller file.jpg

Wedding Black and White Gatefold OpenWedding Black and White Gatefold with band wrapWedding Black and White Gatefold BacksideSupplies: White cardstock, black cardstock, vellum, Justrite wedding stamp, Sue Wilson dies-Gemini Pavo, Cheery Lynn dies- wedding silhouette, leaves, Spellbinders dies- Victorian accents, Spellbinders lables 34 embossing folder, Rose Creations, Memory Box butterfly die, Magnolia dies rose leaves, edge punch, adhesive, bling – rhinestones, pearl and tulle bling, tulle (for the veil). Adhesive, mounting foam, hot glue
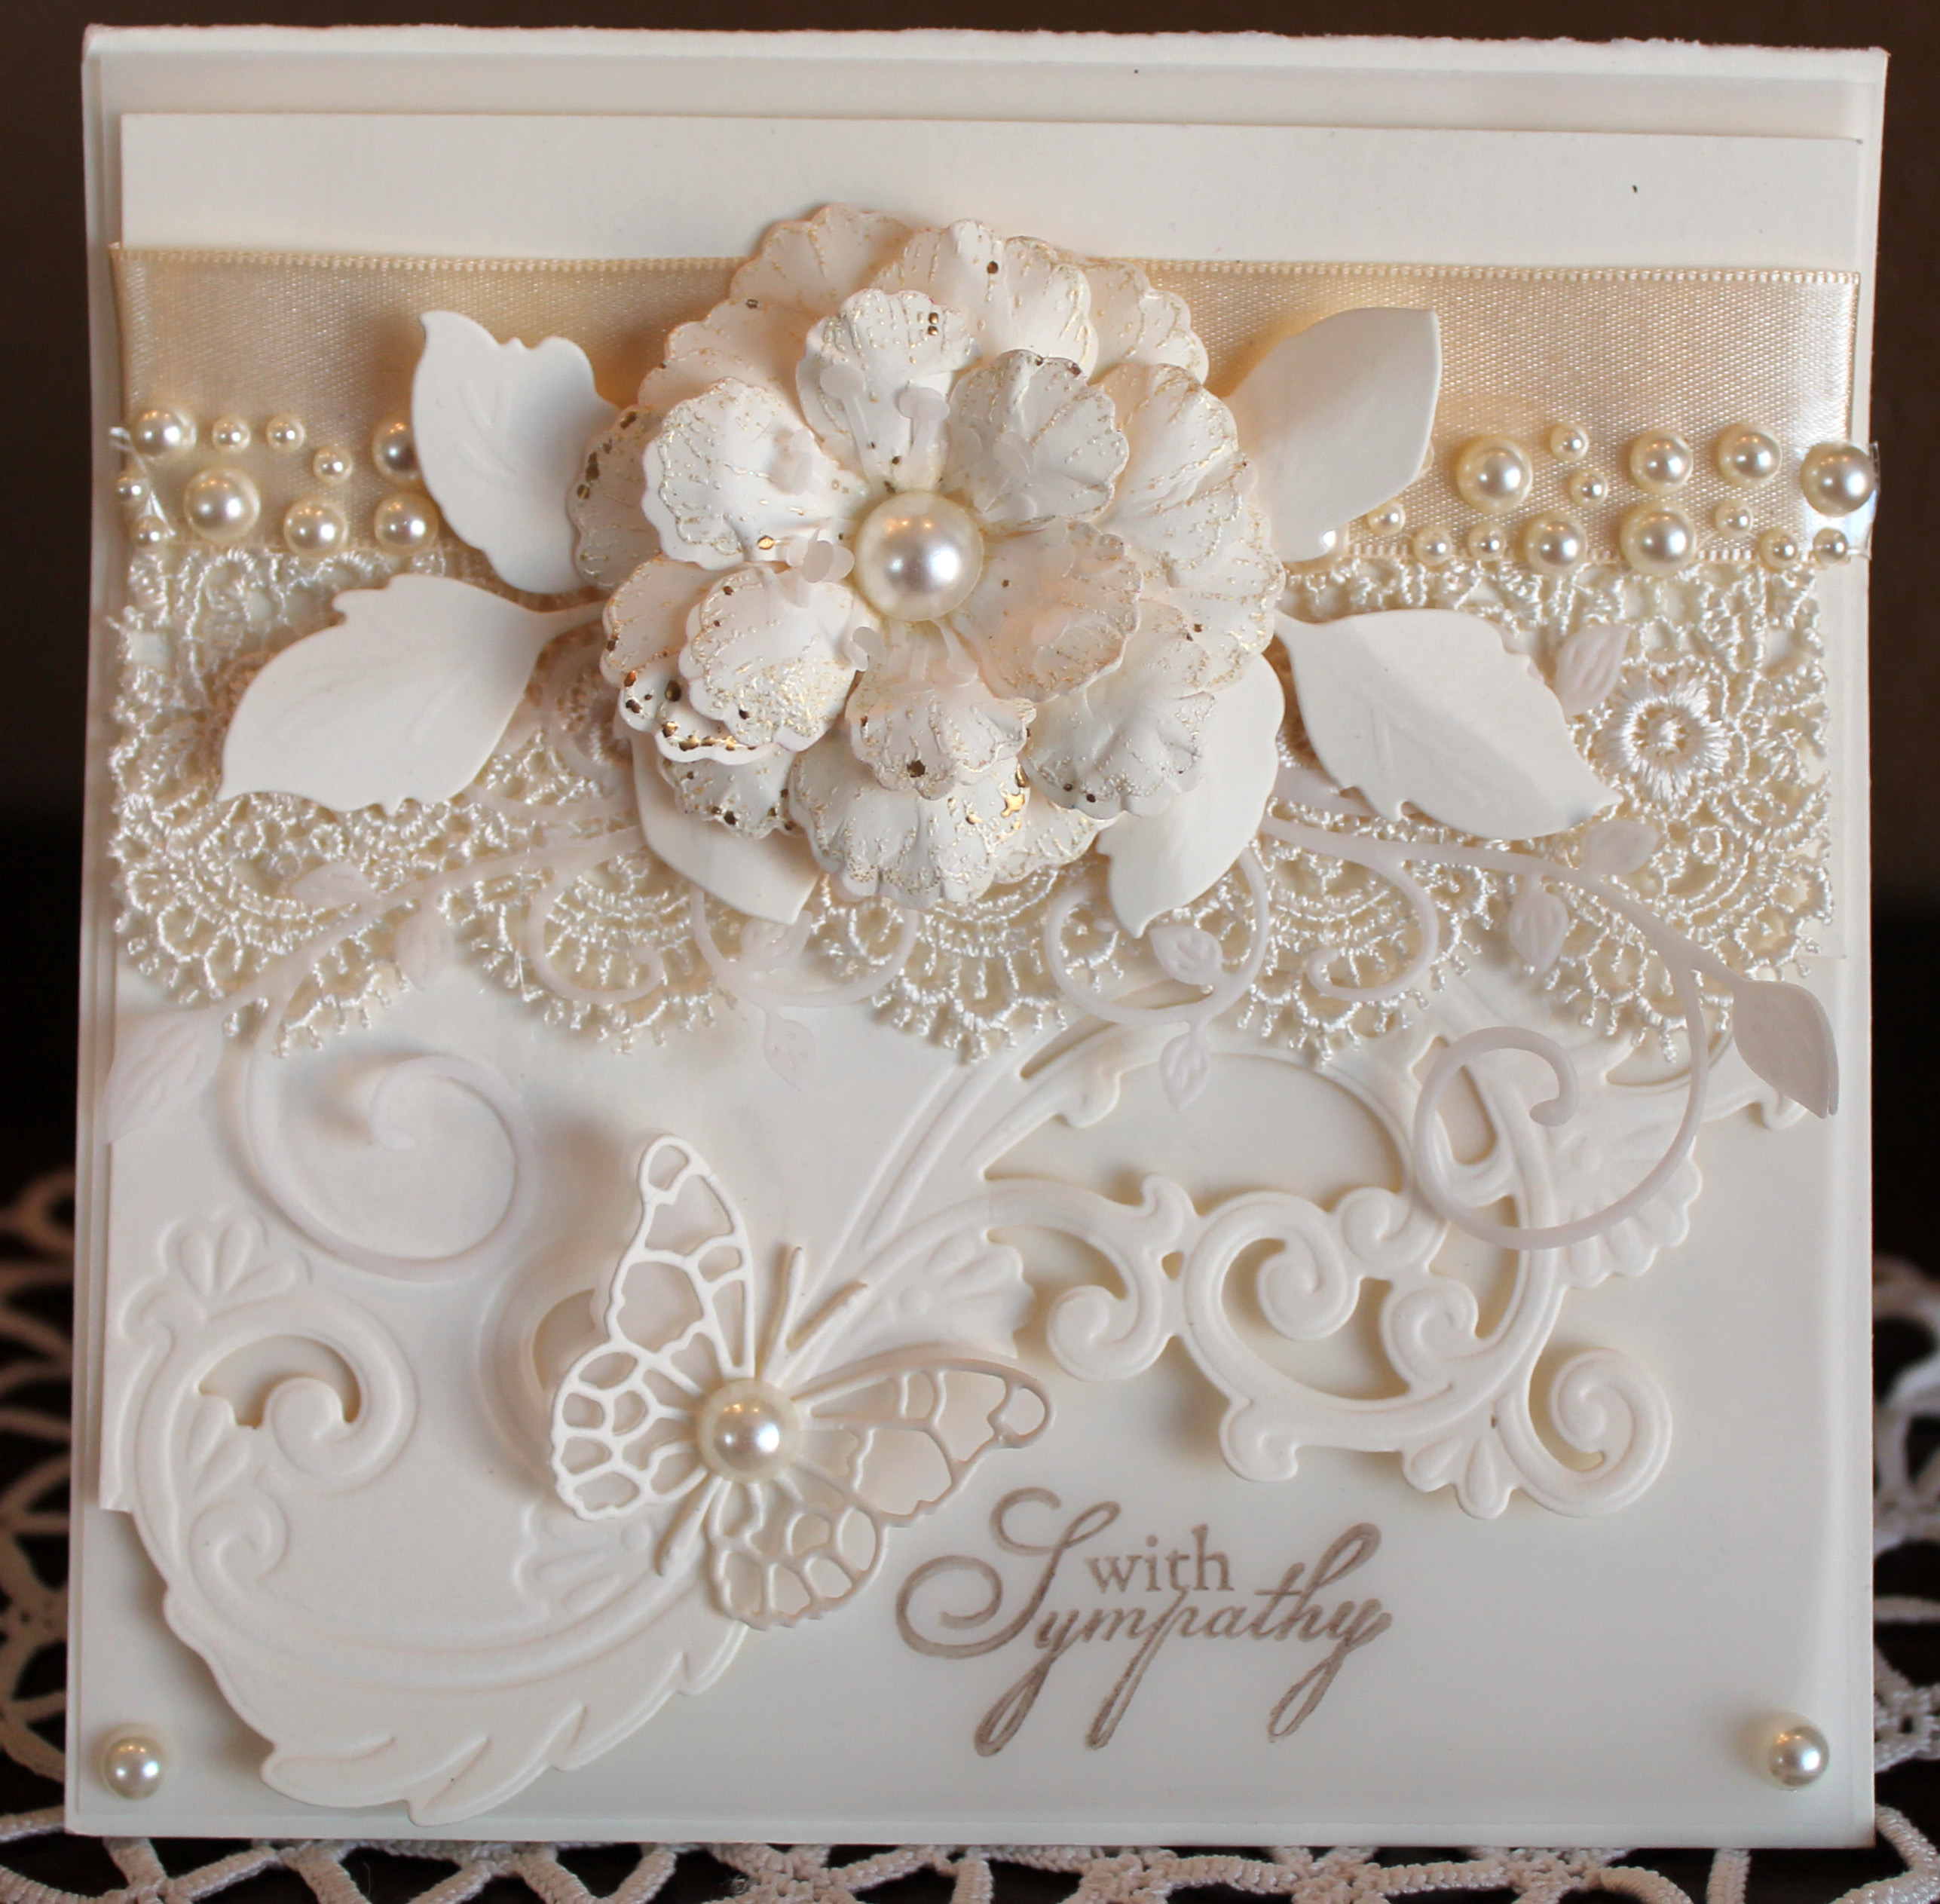
Directions: Your finished card will be 5 1/2″ x 7 1/2″.  Cut white cardstock 11″ x 7 3/4″ score at 2 3/4″ and 9 1/4″  fold the sides into the middle. Put the Pavo die on the 2 1/4″ section and die cut. Repeat for other fold. Cut matching black sections. Emboss white cardstock with folder. Die cut Cheery Lynn wedding silhouette, mount to vellum. Using mounting adhesive, mount the wedding silhouette in the middle. Decorate with flowers and ribbons, tulle, and rhinestone bling. Die cut white side pieces with Pavo die, adhere.  Cut a black matt for the backside 5 1/4″ x 7 1/4″ mount. Cut a white matt 5″  x7″ mount on top of black matt. This will create a lovely space for writing a special note. For the bellyband, cut a strip of white paper 11″ long and 1 1/2″ wide, wrap around- it will be about 2″ too short- cut a 4″ black piece and use a fancy border edge punch and trim both ends adhere to the white piece. Decorate the front with die cuts, vellum leaves, tulle and pearl floral pics, stamp your sentiment, layer your pieces and adhere. Put your belly band around your card and you are finished! 🙂

Here’s to beautiful weddings this summer!

Eileen


Posted on Leave a comment

Sympathy

Hi Everyone,

Today I have a sympathy card. Not a cheery occasion, but if you need one, you want it to be beautiful and reflect your concern and thoughtfulness. I believe I have captured that with this cream sympathy card. With heavy weight cream cardstock, vellum and beautiful die cuts you can achieve this look too!

Supplies: cream cardstock or ivory, vellum, Heartfelt Creations Botanical Rose stamp and die, Memory Box butterfly,  Magnolia leaves, Marianne flourish die, Cheery Lynn flourish, lace, recollections pearl bling, antique embossing powder, versamark embossing stamp pad, Marianne swirl flourish stamp, adhesive

Directions: Cut a 5 1/2″ x 5 1/2″ card base from cream or ivory cardstock, cut one piece of vellum 5 1/4″ square, cut on piece of cream or ivory square 5″ x 5″. Take the ivory square and put the Marianne flourish on die cut and emboss. Line up your vellum and die cut piece and stamp your sentiment. Layer on lace and ribbon, adhere both pieces to the card base. Stamp, heat emboss and die cut the rose. Shape and layer, add the leaves and Cheery Lynn flourishes. Adhere to the card. Cut one butterfly from cardstock and another from vellum, layer, add a pearl and adhere. Stamp the inside with Versamark and heat emboss with the antique cream/gold powder. Write your sentiment inside and give.

Sincerely,

Eileen

cream sympathycream sympathy flower close upcream sympathy butterly and stamp close upcream sympathy inside embossing


Posted on 2 Comments

Thank you! Water lilies & butterflies

pond thank you cardGood morning!

Here’s to hoping spring is in the air, even though it’s still February! I created a unique Thank you! pond card with lily pads, pink and white water lilies, some delightful mini fancy flourishes, and bright butterflies! See the die list and supply list for extra details!

This card is available in my Etsy Shop! see the link to my shop at the right hand side of my blog!

Dies: Spellbinders Labels, Cheery Lynn Mini & Tiny Fanciful Flourishes and , Magnolia Doohickey Water lily, Memory Box butterflies

Supplies: Ken Oliver Color Burst Water Color, #140 cold press water color paper, Penny Black thank you stamp, memento ink – tuxedo black, silver stamp paint, dew drops, Recollections Navy Blue cardstock, white card stock

This card is being entered to http://cheerylynndesigns.blogspot.com/2016/02/cheery-lynn-designs-challenge-223-add.htm

Enjoy your sunny weekend! (or at least I hope it’s sunny where you are today!)

Eileen