Posted on Leave a comment

Paper Crafting Meets Glass Fusing!

What?? Paper craft and Fused Glass? How does that work?? Doesn’t the paper burn up? How do you get your stamped image to stay on the glass?

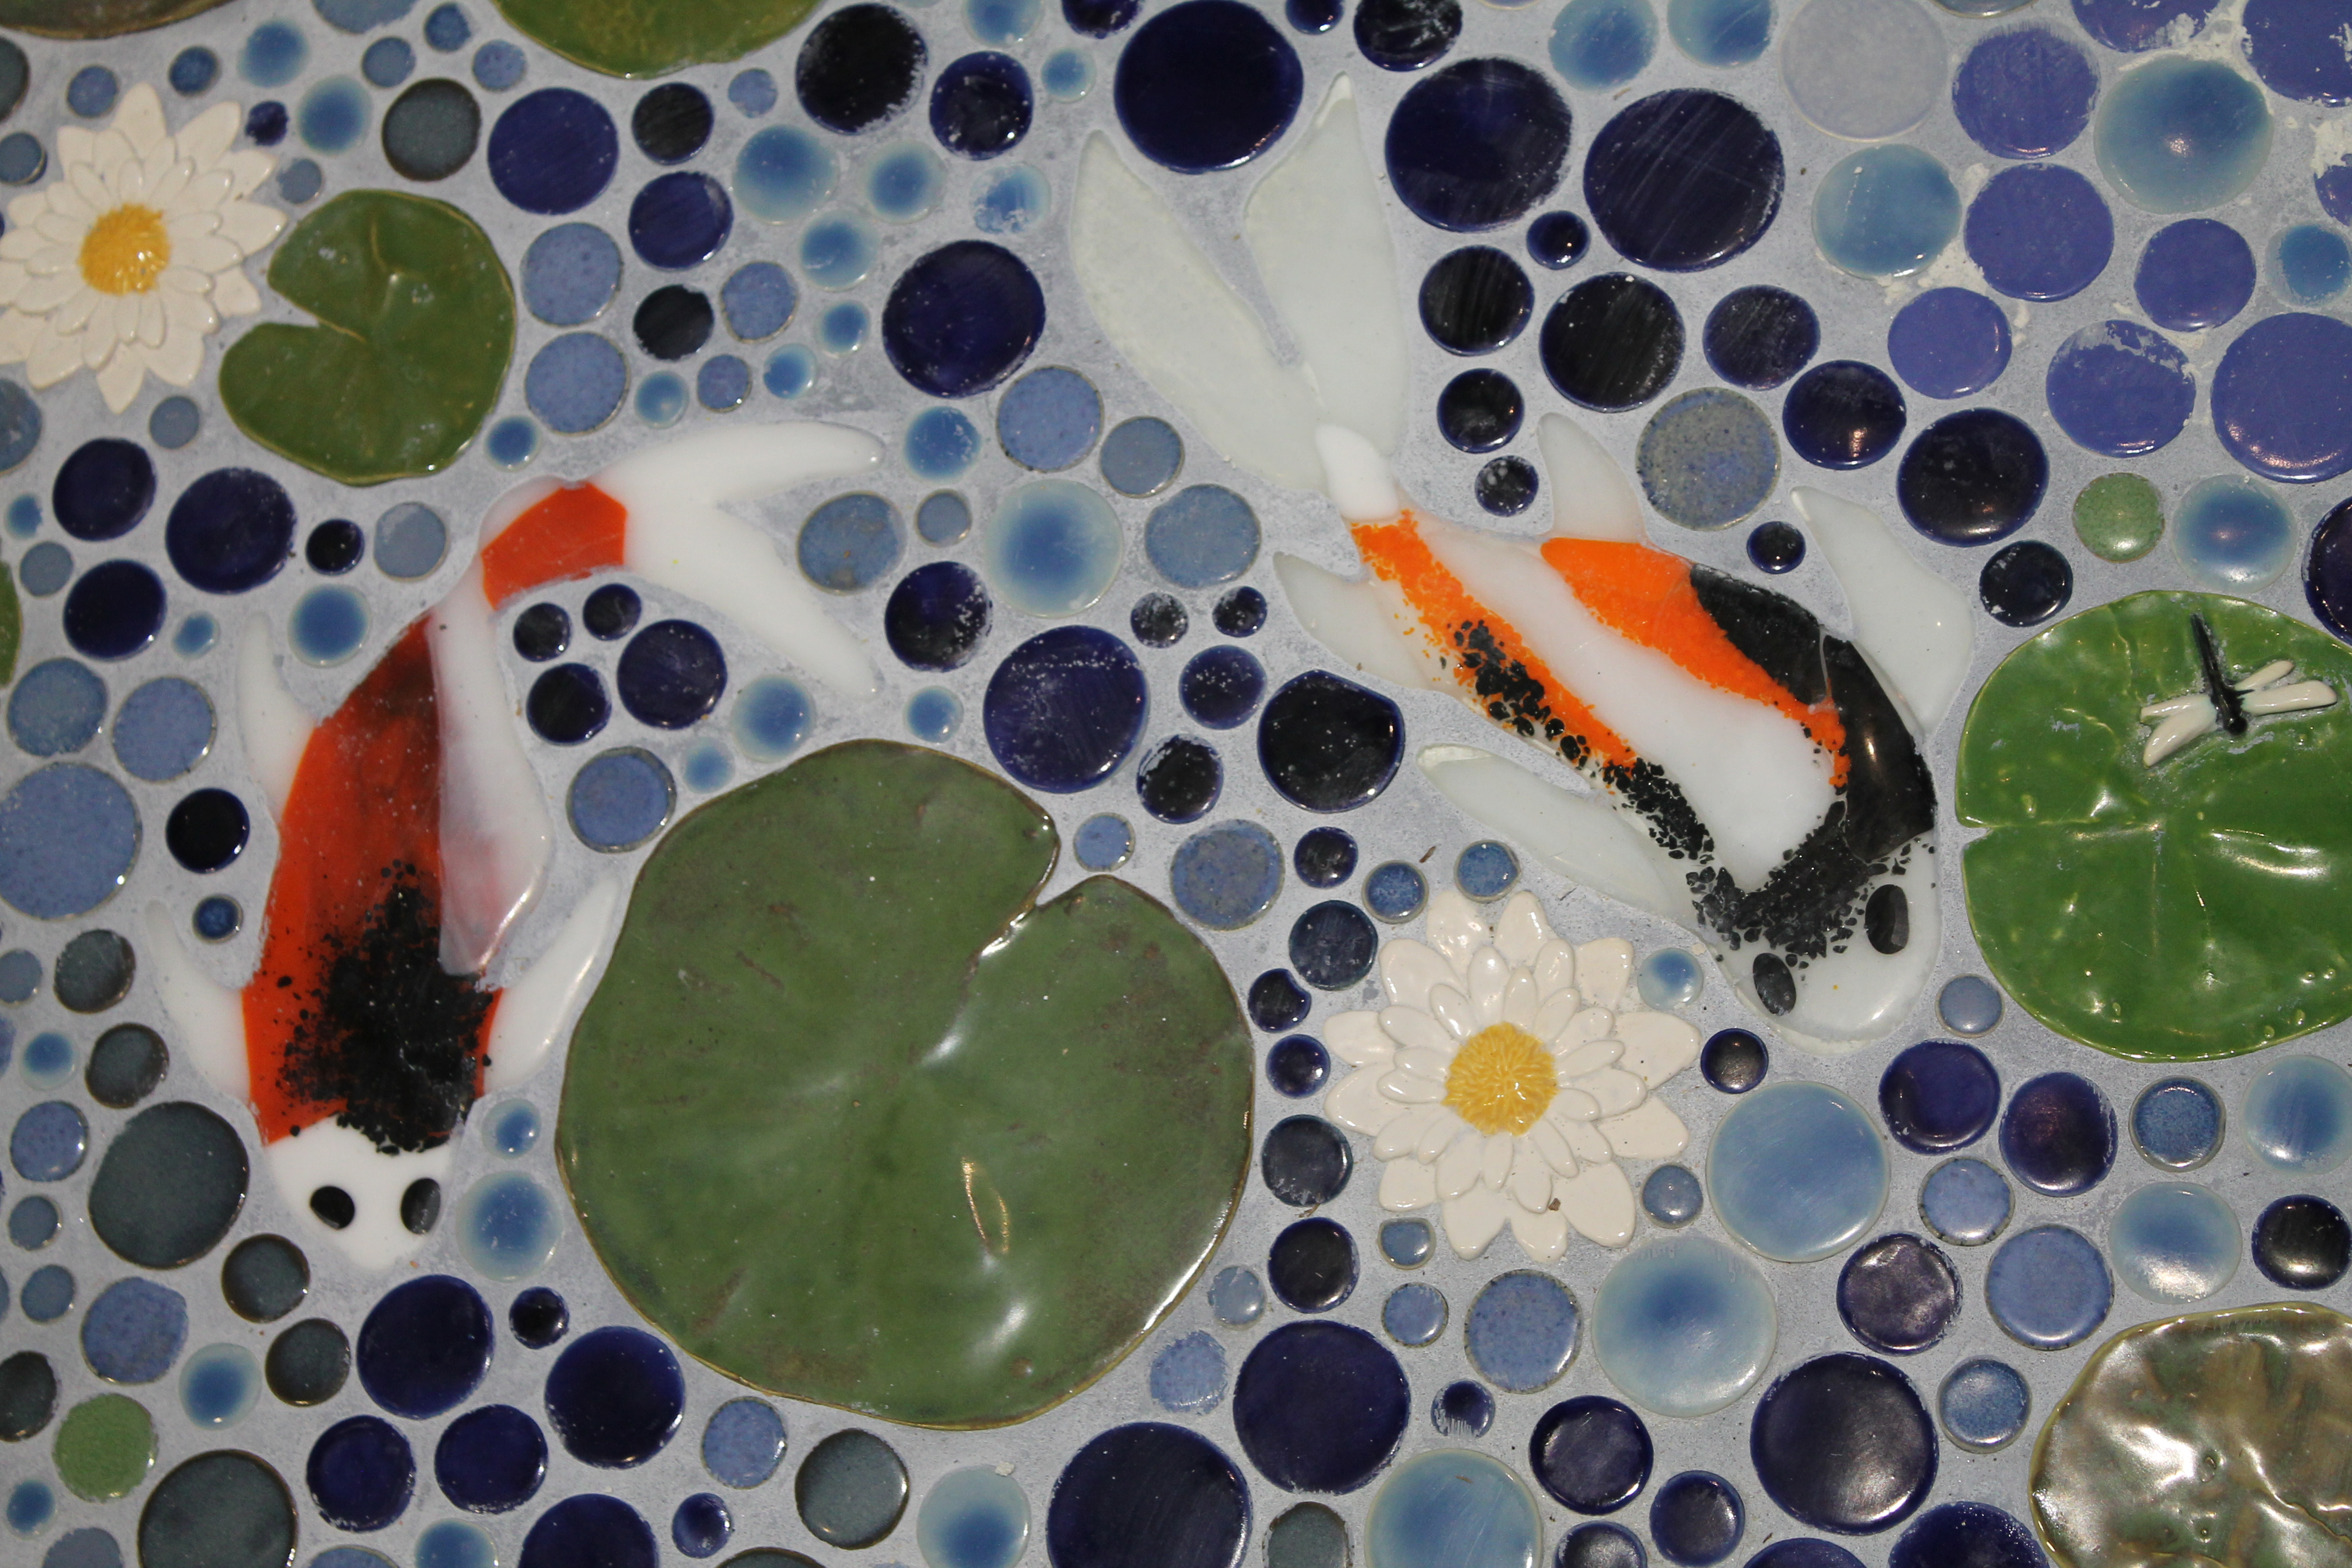
I have been fusing glass for about a year now and it started with wanting to make glass koi fish for my son’s pond bathroom (see the finished bathroom here https://hydeparkhill.com/2016/10/12/pottery-adventures-part-2/ ) it was a pottery and glass adventure! Now I am making glass dishes and glass ornaments, glass pendants, and glass this and that and the more I do, the more I want to combine it with my paper crafting skills so here are some of my pieces. 🙂  Check out my hydeparkhill.etsy.com shop! (link on the side bar)

Supplies I used: System 96 Icicle Clear fusing glass 12″ x 6″ piece cut in half, glass slumping mold (I used one from Delphi Glass called “Sweet Treat” it’s a 7 x 7 mold), Papyros glass fusing fiber paper, mold release spray, white high temperature enamel, snowflake stamps and die from the Snow Kissed Collection from Heartfelt Creations, die cutting machine, glass kiln.

Directions: Cut a piece of glass fusing fiber paper with the large snowflake die. Putting a piece of wax paper between the fiber paper and the die will help the fiber paper to come out easier. Fiber paper is more fragile than regular paper and you don’t want it to rip. Follow the directions for mixing the enamel to stamp. (There is a good video about glass stamping on  Slumpys.com) Using a brayer, apply the sticky enamel to the stamp, be careful not to put too much on and stamp the top piece of glass with random snowflakes, leaving the space in the middle of the glass blank. On your kiln shelf layer a 7″ x 7″ piece of fiber paper, then the snowflake cut from fiber paper, next the blank piece of glass, the stamped piece of glass and put it into your glass kiln. Set for a full fuse. If you need a fusing schedule, please leave a comment and I will be happy to share mine with you. After it is fully fused, leave the die cut in the bottom of the glass, place the fully fused piece on top of your slump mold. Fuse to a slump temperature. When your kiln is below 100 degrees take it out and enjoy! The snowflakes are now a permanent part of the glass and will not wash off.

Below are some other versions I made with different dies! I think the results are stunning! The creative aspect of possibilities is absolutely endless. The bottom picture shows the gentle slope of the dish. Perfect for dessert, appetizers, a hostess gift, candy, endless possibilities!  Enjoy!

Have a beautiful creative day!

Eileen


Posted on 1 Comment

Just for you!

Good morning everyone!

Here is a lovely pink, black and white card! This card features die cuts from Cheery Lynn and Heartfelt Creations!

Materials: Cardstock- white, black, pink and black glitter, embossing folder, Cheery Lynn Scandinavian Oval, Just for you Oval, flourishes, Heartfelt Creations Arianna Blooms, adhesive, black bling. Distress ink: picked raspberry, Versamark watermark ink

Instructions: Cut an A2 card base from white cardstock, (5.5″ x 4.25″) cut black mat (5.25″ x 4.0″), cut pink mat (5.0 ” x 3.75″) and emboss with folder of your choice. On white cardstock: stamp Arianna blooms flowers twice with watermark Versamark, sprinkle with white embossing powder, heat set. Color with picked raspberry distress ink, cut out, shape, set aside to dry. Meanwhile, cut the doily, sentiment and layer with adhesive. Cut black and white mat for inside.

Assemble flowers, assemble card! Done! Easy Peezy! 🙂

Have a beautiful day!

Eileen


Posted on 1 Comment

Pottery Adventures Part 2

Well, it’s finally done! My handmade ceramic and glass pond bathroom floor has been installed and grouted! It took several months to make, two days to install and 10 hours to grout! Our son loves it!! He said his favorite part is to lay on the dock and look up out the skylight at the sky and watch the clouds go by! ahahahhaha!!!! That makes me laugh!

The tile was handmade at the local “The Potter’s Shop” in Waukesha, WI. http://www.potteryinwaukesha.com  To make the turtles, frogs, and water lilies I poured plaster into a bowl and after it hardened I carved into them in reverse 3-D with a Dremel tool. I pressed B-mix stoneware clay into the molds to get my turtles, frogs and lilies. I made the lily pads by using real lily pads to make molds, then pressed slabs of clay into them. I made the glass fish by cutting glass, grinding the pieces with a glass grinder and then fusing them in my glass kiln. If you want to read more about the process, check my other blog post! https://hydeparkhill.com/pottery-adventures/

We laid white thin set mortar on the floor with a notched trowel, cut up our mesh mounted tile into smaller sections and then brought them in on thin flexible boards and put them into place. The final step was to grout. We went to The Tile Shop https://www.tileshop.com to buy the perfect color grout! (Our large stepping stone in front of the shower was purchased at the Tile Shop too!) We chose a “country blue” grout that wasn’t too dark of a blue or too light so that the tiles and fish pop instead of disappear.

The large stepping stone is in front of the shower. We did put in a heated floor, because its an “inside bathroom” with no heat ducts and it makes the room cozier! There are also no windows, we purchased a remote control skylight and put an opening up through the ceiling all the way through the attic! We picked up the Kolher urinal from our local Habitat for Humanity Restore! It was $5.00!!! Can’t beat that! This is a “galley” bathroom. There are two doors, one at each end, one goes into the master bedroom the other goes to a little alcove across from our son’s bedroom and is also near the kitchen. The master bedroom has another door that goes to the living room and a set of French doors that go to the back deck. Yes, there are locks. 🙂 We have a second bathroom, it’s in our master bedroom and backs up to this one. When you have a small house you get creative with your space, try to make the most of you space, and you try not to waste any space! Every inch counts!

The green foam thing is where our “western toilet” goes! I promise it’s not a squatty potty! The linen closet is on the dock at the moment, as we had to pull it to put in the tile. Just a bit of clean up now and re-install the toilet, linen closet, reconnect the sink and do some touch up on the wall paint. Check the last picture for the final look! But now, of course, we are thinking, it needs some ceramic cattails on the walls. 🙂 perhaps….. later! 🙂

Enjoy the Pictures!


img_6766
Before the mosaic was installed, we installed the “dock”. We used weathered plank tile.

img_6768img_6769

img_6786
All the mosaic installed and grouted.
img_6787
A view from the other end.

img_6790img_6791img_6792img_6793

img_6794
The towel bar- made with old telephone pole cross bars and jute rope.


img_6798
Finished!
img_6799
See, we do have a western toilet! 🙂
img_6800
Finished floor, now we have to finish the molding around the door.

Thank you for reading and looking at our adventures!


Posted on Leave a comment

Congratulations!

Hello everyone!

Good morning! Wow, I have been making cards like crazy for an upcoming vendor fair. Here is one of my favorites!

Supplies: Spellbinders Peony, Rose Creations, Rose leaf, Decorative square die, embossing folder, pearl shimmer paper, 6″x 6″ 110# cream cardstock base, gold poster board, Distress Ink- picked raspberry, antique linen, vintage photo, peeled paint, mowed lawn, forest moss, faux pearls, vellum, congratulations stamp, staz-on timber brown ink, paper glue adhesive and hot glue, faux pearl and rhinestone embellishment.

Directions: Cut all the layers for your flower and leaves. (I used all the Rose Creations dies and two of the largest peony dies to make my flower bigger. I cut off the jagged edges of the peony petals to make them match the Rose Creations die better.) Spray pieces with water with a mini mister and ink with distress ink, shape petals, set aside to dry. Cut base and all matt layers, cut shimmer paper and emboss with chosen design. Layer your card, attach bow and adhere to card base. Glue your flower together with hot glue and add it to the top of all this beauty. Embellish bow with a gorgeous button. Double matt the inside. Done! 🙂

Have a creative day!

Eileen

Congratulations large rose pearl embellishment.jpg


Posted on Leave a comment

Pieces of My Heart

Hello everyone!

Today I have a mixed media piece to share with you! This piece was created with ceramic stoneware clay, watercolor paper, ink, adhesive, pearl faux bling, and is mounted on a 1 3/4″ thick piece of cedar board.

img_6692

The process to make this piece was a bit long, but worth it! First, I slab rolled a piece of B-mix clay and put it on a dry wall board. Next, I took my hand drawn heart pattern and put it on the clay and traced it, then  pressed in letters, stamps and foam letters into the heart to make the words. Carefully, I cut it into pieces, but left it on the board and didn’t pick the pieces up. I let it dry in a wet room for a few days with a dry wall board on top of it. I took it out of the wet room and cleaned up all the pieces and continued to let it slowly dry for another week. All the pieces with words were carefully under glazed with dark grey and then all of it was bisque fired to cone 05. After the bisque fire, the cross was glazed with Temmoku (Amaco Potter’s Choice), the word pieces were clear glazed and it was all fired to cone 5. I used E6000 adhesive to glue my heart to the cedar board.

All the flowers were made from 140# cold press watercolor paper. I used Spellbinders Rose Creations die and rose leaf die and Heartfelt Creations classic leaves with matching stamp, and a Cheery Lynn flourish.  All the flower layers were spritzed with water and then sponged with “picked raspberry”, “antique linen”, and  edged with “vintage photo” Distress Ink. They were shaped while they were wet with a bone folder and stylus tool and allowed to dry before assembling into flowers. Vellum stamens were made using a McGill paper punch, faux pearls were added to the centers of each flower. The Spellbinders leaves were die cut, the Heartfelt Creations leaves were stamped onto the watercolor paper then die cut and inked with “peeled paint, mowed lawn and forest moss” Distress Ink. I used hot glue to glue all the flowers together and to glue the pieces to the cedar board. I did a “dry run” to figure out where I wanted everything before I started gluing.

This project is based on: Philippians 1:6 “He who began a good work in you will be faithful to complete it.” I wanted to express how the Holy Spirit works in our hearts to complete us. First beginning at the center of our hearts, with the two things Jesus said were the most important: A relationship with God-Love God and a relationship with others -Love Others. They are connected and possible because of what Jesus did for us on the cross. All the other character qualities coming from our hearts and lived out in our lives are a result of the Holy Spirit working to complete us.

I did this project for an art show at RiverGlen Christian Church in Waukesha, Wisconsin.

Here are some more photos of this project!

img_6692img_6674img_6694img_6693img_6673img_6698img_6696

Have a beautiful day!

Eileen

Posted on 5 Comments

50th Anniversary

Hi Everyone,

I have an amazing easel card for you today. Check out all the pics to see all the lovely details! I will try to list the supplies but I might miss a few. 🙂

Supplies: 140# cold press extra white watercolor paper, 110# white cardstock (5″ x7″ easel card base), vellum, shimmer pearl paper, gold cardstock, embossing paste, wedding glitter, rambling rose embossing folder, Marianne dies- wedding couple, the top arch, Spellbinders rose & leaf, Sue Wilson maidenhair fern, Cheery Lynn mini flourish & fishtail banner, gossamer white ribbon, pearl/rhinestone embellishments, pearl/rhinestone button, heart stencil, baroque stencil, Heartfelt Creations heart die, a variety of ribbon and lace, foam dimensional bits, a bit of tulle for the veil. 1″ circle punch- for making the pocket on the back. I am sure I am missing stuff, but you get the idea 🙂 oh, Distress Ink: Peeled Paint.

Directions: Cut everything, edge the greenery with peeled paint.  Assemble from base up ending with Roses. Embellish with pearls and rhinestone bling. I left my roses white, but you could add color if you want. Terrible directions, but it took a few hours to put together, mostly because I couldn’t decide “Exactly” how I wanted it. In the end, like most cards, they come together perfectly how you tried to envision them! and in some cases, even better. 🙂

If you do have a specific question about any dies/paper, please feel free to leave me a comment, and I will be sure to answer your question.

Happy Crafting!

Eileen

Posted on Leave a comment

Friendship Garden

Hi Everyone!

Here is a new favorite card I made this week, a friendship garden card. It’s a step card which makes it possible to add more details and depth than a regular flat 5 x7 or something. 🙂  Using a step card die from Cheery Lynn makes this step card a breeze to create! There is no more endless measuring and cutting and scoring as the die does it all for you. Of course I used botanical rose stamp and die from Heartfelt Creations, it’s my favorite flower die and stamp set. I love the little birdies that come with this set too! Supplies and directions are below! 🙂

persimmon friendship garden front view

Supplies: Cheery Lynn step card die, Heartfelt Creations Botanical Rose stamp and die, birds and blossoms, Heartfelt Creations classic leaves, Sue Wilson Stockholm, Justrite garden sentiment, Justrite leafy background die, 110# white cardstock for the step card base, turquoise Recollections cardstock for accents, pearl shimmer paper, Distress Ink- persimmon, mowed lawn, Staz-on Black ink, vellum, flower shaping tools, adhesive, imagination

Directions: Cut step card base and other pieces, stamp, color and cut flowers, leaves, birds, stamp background, cut out Stockholm piece three times and glue together, cut vellum piece and stamp, attach to Stockholm. Arrange flowers, leaves, sentiment etc and adhere. Enjoy!

Have a beautiful week my friends,

Eileen


Posted on 1 Comment

Golden Anniversary

Hi Everyone! Happy Saturday!

Today I have a golden anniversary card for you! Not many couples reach a golden anniversary of 50 years together, but when they do, you want a beautiful card for them! Enjoy! Supplies and Directions are below! Golden anniversary front view

Supplies: Gold mirror cardstock (Hobby Lobby), embossing folder, Victorian Majestic Oval Spellbinders, Heartfelt Creations Arianna Blooms stamp and die set, Magnolia leaves, Tattered lace flourish, Marianne oval, Cheery Lynn fishtail banner die, gold embossing powder, antique gold/cream embossing powder, faux pearl bling, vellum, 110# ivory cardstock base, golden pearl shimmer paper (recollections/Michael’s), vanilla cardstock

Directions: Using a 5 x7″ cardstock base, layer gold mirror cardstock and emboss golden shimmer paper, wrap with lace and ribbon. Die cut all your gold pieces. Die cut leaves and flourish from shimmer paper. Stamp and heat emboss Arianna Blooms on vanilla cardstock, die cut with matching die. Shape and layer flowers. Stamp sentiment with Versamark watermark, sprinkle with gold embossing powder and heat set. Die cut with Cheery Lynn Fishtail banner. Assemble card, embellish with faux pearls. Enjoy!

Have a beautiful day!

Eileen

Posted on 2 Comments

Congratulations Wedding Card


wedding satin flower card full front
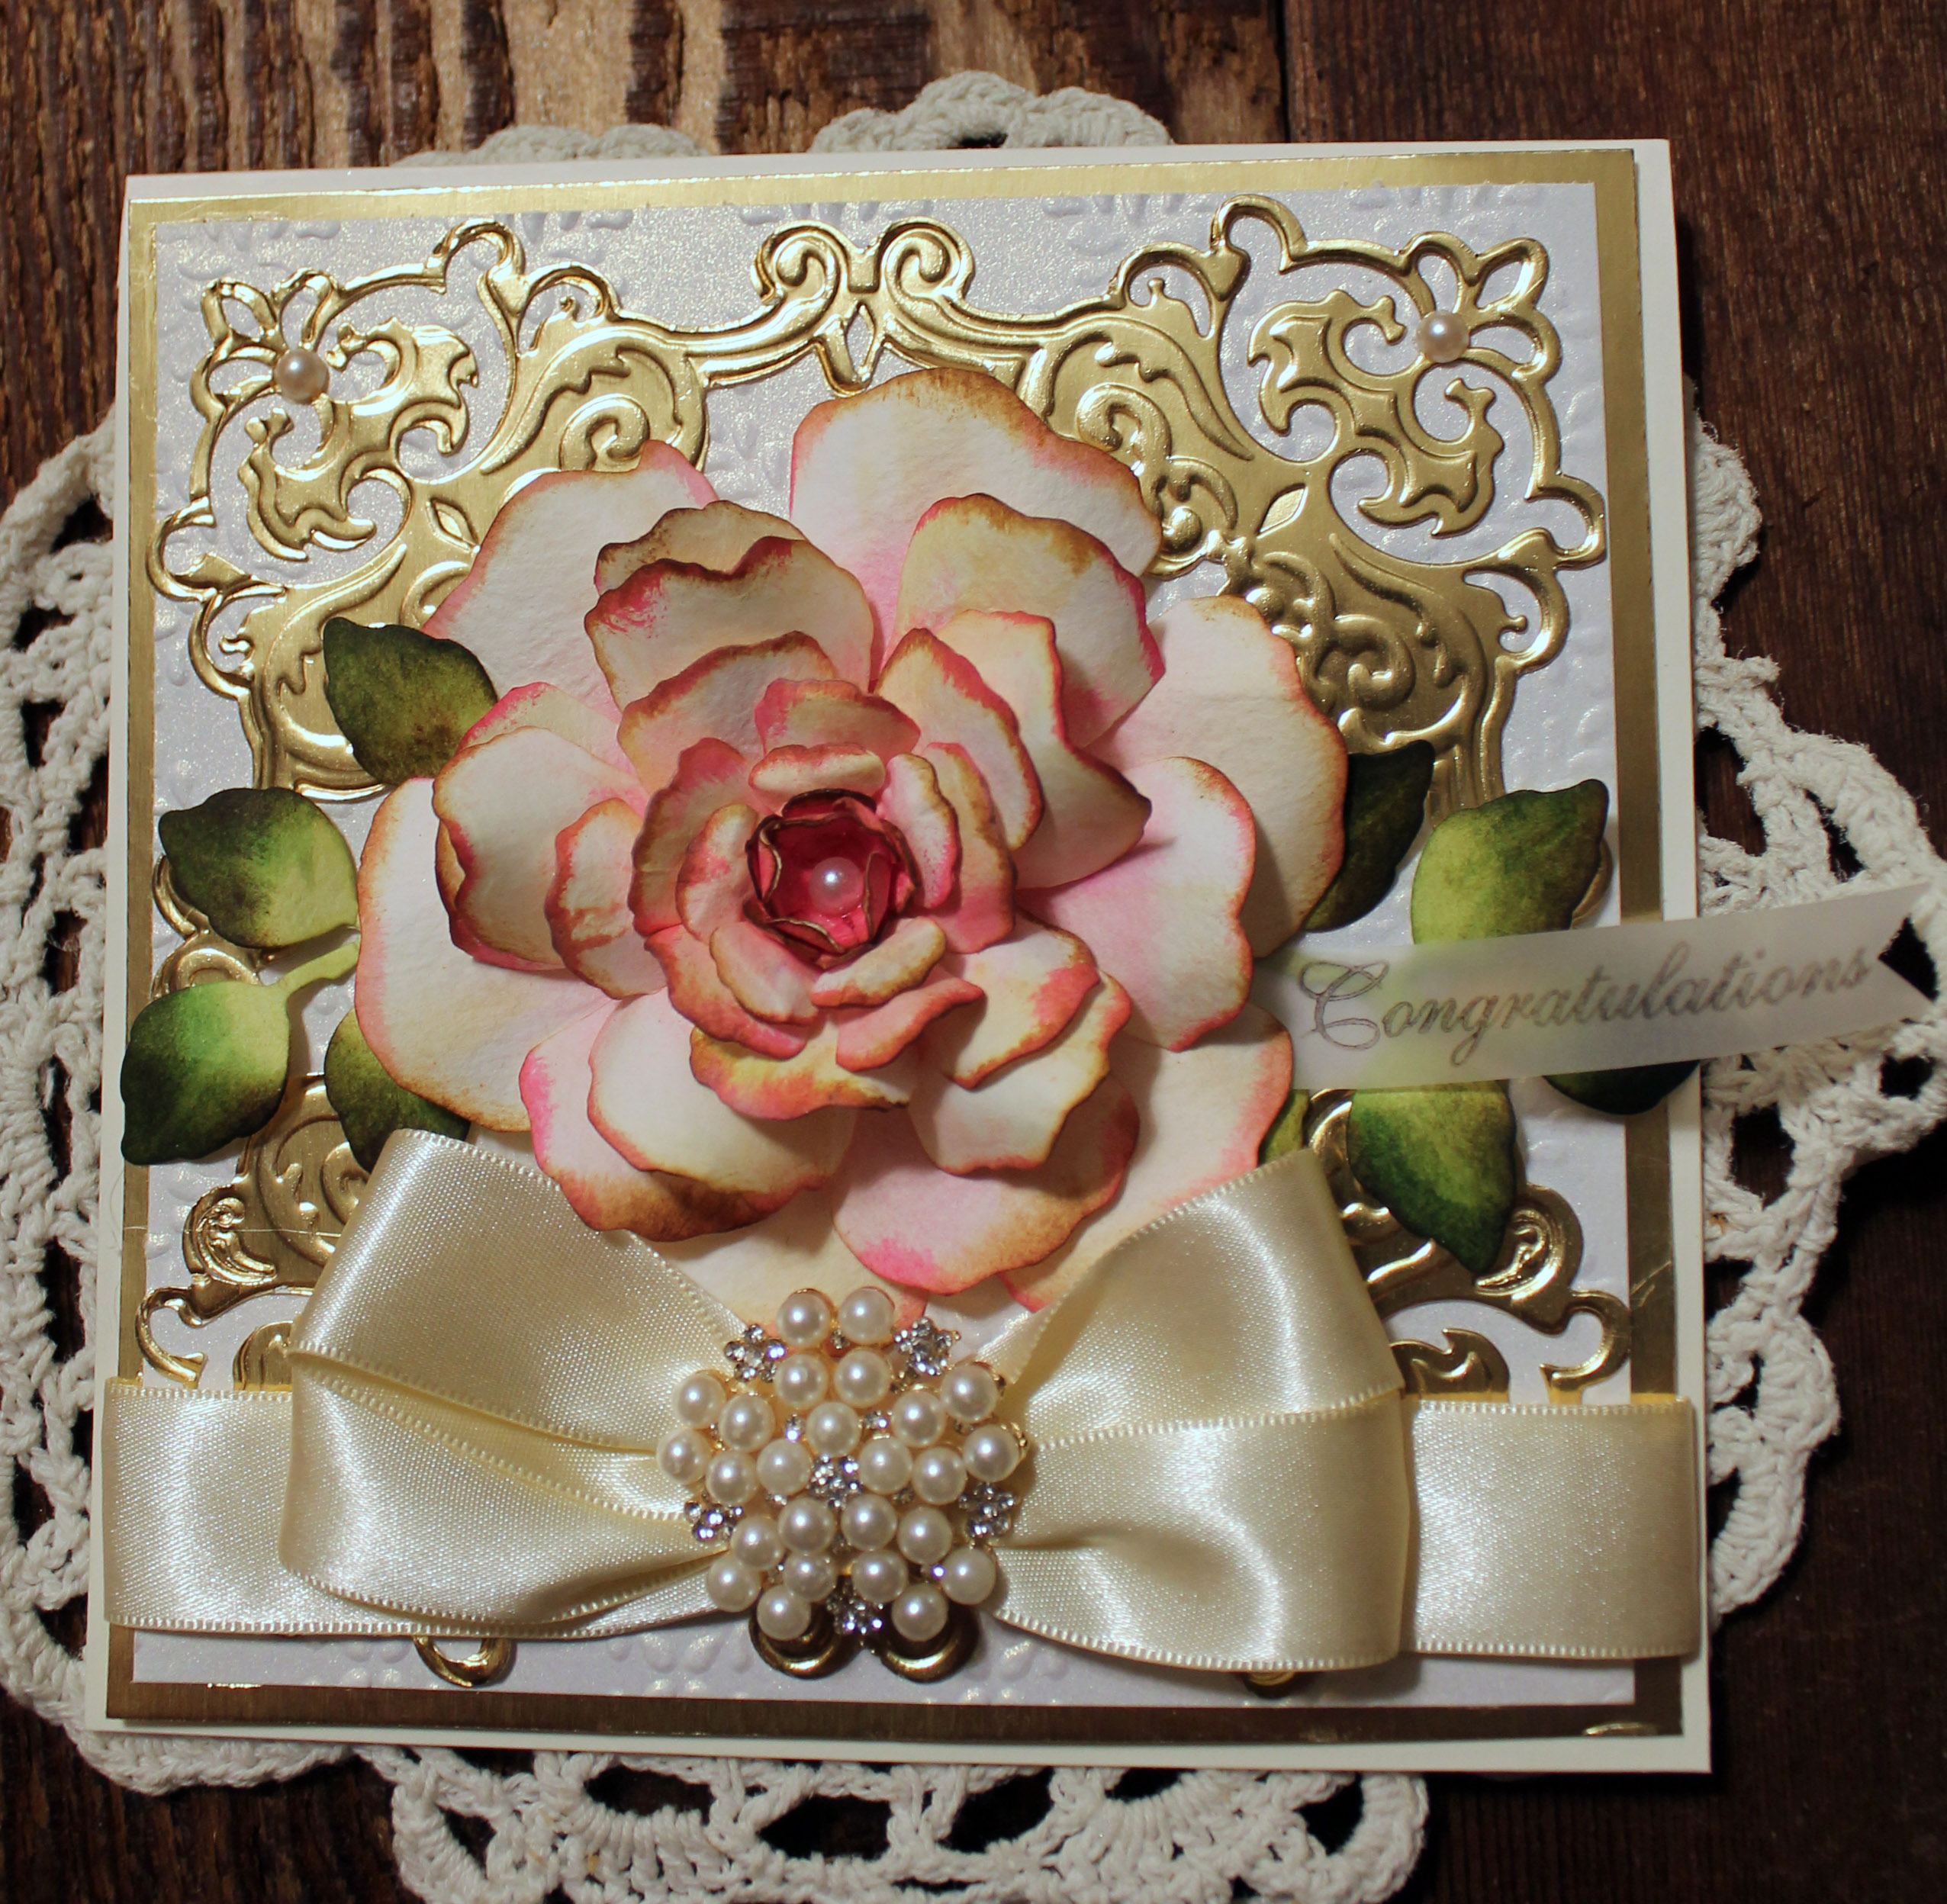
Good morning Everyone! Today I have a feathery soft, beautiful congratulations card for you to enjoy! Ribbon roses, feathers, a satin layered flower, and rhinestone bling, a stenciled background and a lovely Cheery Lynn fishtail banner stamped with the sentiment! Want to recreate this card? Follow along!

Supplies: Cheery Lynn Fishtail banner, Tim Holtz tattered flowers die, baroque stencil, embossing paste, 140# cold press watercolor paper panel 5″ x 6″, pearl shimmer paper 2 pieces cut 5 x7, white feathers, pearl & rhinestone bling, rhinestone brad, Black Staz-on Ink, Vellum, 110# white cardstock 5″ x7″ card base, Zutter Distress It All, Adhesive (hot glue/wet glue), Justrite congratulations stamp

Directions: Using the stencil, emboss your watercolor paper and set aside to dry. If you want, you can sprinkle glitter onto the wet embossing paste for extra bling! Cut your flowers from Tulle and Satin material, layer and poke a rhinestone brad through the center. Stamp your sentiment onto vellum, heat set, cut with the medium size Cheery Lynn fishtail banner die. Double matt the inside of your card base with pearl shimmer cardstock and a white layer for writing personal note. Tear the bottom half inch from your embossed layer, using the distress tool, distress the edges of this  (except the torn edge) distress your pearl shimmer layer. Assemble your card as show using a strong adhesive for the watercolor layer and card base. Give it to someone special in your life for their special occasion!

click on the pictures to see them larger! 🙂

I am entering this card into the Cheery Lynn Bi-weekly Challenge http://cheerylynndesigns.blogspot.com/search/label/challenge


Have a beautiful day!

Eileen


Posted on Leave a comment

Just Beeeecause honeybee card

justbecause bee card front viewHello Everyone!

Here is a sweet card! Two versions of the same card— one that says “just because” and another that says “Sweet Friend”. Both card have the same features- a beautiful arrangement of flowers and a large honeybee.  The perfectly sweet way to say hello to your friend, near or far. Available in my Etsy shop, HydeParkHill. 🙂 enjoy !

Supplies: 6″ x 6″ white cardstock base, dark brown cardstock (for matting), 5.5 square of 140# cold press watercolor paper, Tim Holtz honey bee die and texture embossing folder, Honeycomb die from Tim holtz mixed media dies, Heartfelt Creations Bontanic Rose stamp and matching die, Heartfelt Creations classic leaves stamp and matching die, Heartfelt Creations Blossoms & Birds collection small flowers. Spellbinders frame, embellishments- seed beads, yellow flower soft, broken glass glitter, brown walnut stamp paint, Distress Ink: honey, Vintage Photo, Victorian velvet, mowed lawn, peeled paint, black soot, walnut stain, Staz-on Timber brown ink

Directions: Cut a 5.5″ x 5.5″ card base from white 110# cardstock, this will make a strong base for card.  Cut your dark brown cardstock for two matts 5.25″  x 5.25″, cut a white inside matt of 5″ x  5″. Cut a 5″ x 5″ piece of watercolor paper. Cut the honeycomb die from the top left and bottom right of the watercolor square. Color this piece with honey ink and edge with some vintage photo ink. Set aside to dry. Cut your bee and emboss with the texture matt. color the body with black soot and walnut stain ink. Color the wing edges with vintage photo and then lightly with some walnut stain. Put some “dries clear glue” on the body on the stripes and sprinkle with yellow flower soft. put glitter on the wings. Set aside to dry. Stamp your flowers on watercolor paper with Staz-on.timber brown ink  Color the middles of your flowers with Victorian velvet. Cut our your flowers and edge with vintage photo and shape. Stamp the largest classic leaves stamp with brown and color with mowed lawn and peeled paint, die cut and then edge the leaves with vintage photo. Cut two frames from Spellbinders, glue together or use a chipboard frame. Coat with brown stamp paint. Set aside to dry. Assemble your layers inside your card and outside on the front. Add dimensional foam to your frame and bee and attach. Hot glue your flowers to the leaves and fill with centers of flowers with seed beads. Add your sentiment! Done! Enjoy!

Happy Crafting!

Eileen